
For many years, it’s been possible to analyze synchronized CAD geometries in COMSOL Multiphysics® via the LiveLink™ interfacing products. But did you know that you can also incorporate this functionality into an easy-to-use simulation app? With an app, you can dynamically modify your geometry in a CAD program such as SOLIDWORKS® and use this information to analyze new product designs. Today, we will demonstrate how to do so, using the new Bike Frame Analyzer app as an example.
Integrating Simulation Apps and CAD Design Tools
For the design community, the advantage of creating easy-to-use and custom simulation apps is obvious. If simulation can be incorporated into the CAD design process, then products will move to market quicker, with lower risk of mistakes and anomalies that might arise in the manufacturing process. Furthermore, introducing simulation into the entire engineering workflow — as opposed to just a few specialists in analysis and simulation — increases a company’s scope for innovation while incorporating everyone’s expertise.
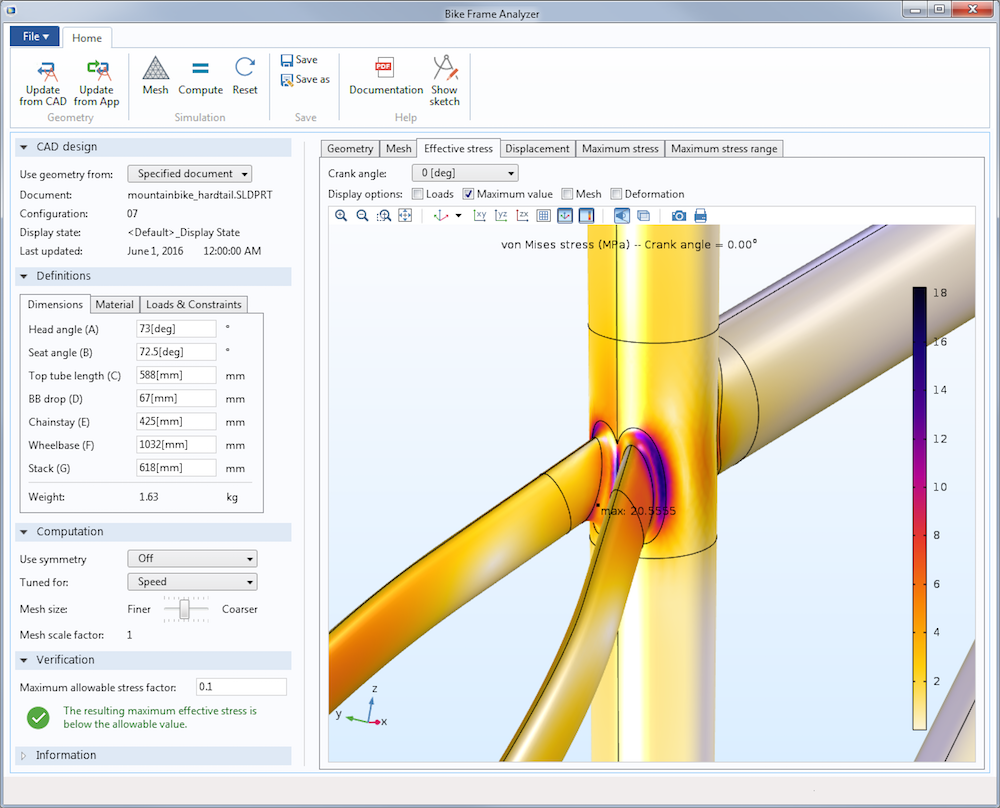
The Bike Frame Analyzer app, combining the benefits of simulation and CAD design.
Combining the power of a CAD design tool (in this case, the SOLIDWORKS® software) with a simulation app (the structural analysis of a bike frame) in the same modeling environment enables the simulation and/or design engineer to work with both in synchronicity. The associative features between the two tools means that changes applied within one of them are immediately updated in the other. While the Bike Frame Analyzer app is quite simple in its structure and is easy to use, it contains great flexibility in the parameters that can be investigated, whether they involve the design’s geometric dimension, material properties, or the loads and constraints to which the frame is subjected.
Exploring the Bike Frame Analyzer Simulation App
The Bike Frame Analyzer app enables you to apply a combination of loads and constraints to the frame geometry and identify the maximum stress location. You can also easily analyze different configurations of a frame to see the effects of varying dimensions and materials.
By building a customized user interface with the Application Builder (included in the COMSOL Multiphysics software), we can design the app to streamline our simulation workflow. For this app, the settings and feedback are placed in vertically arranged sections to the left; a large graphics display to the right shows the model geometry, mesh, and results; and the top ribbon contains all of the app’s buttons, which initiate a process in the simulation workflow (e.g., solving).
Apps that use the LiveLink™ for CAD products are designed to work side-by-side with the CAD tool you are using. This means you can run the Bike Frame Analyzer app while the original CAD file is open in the SOLIDWORKS® software and switch between the user interfaces as required.
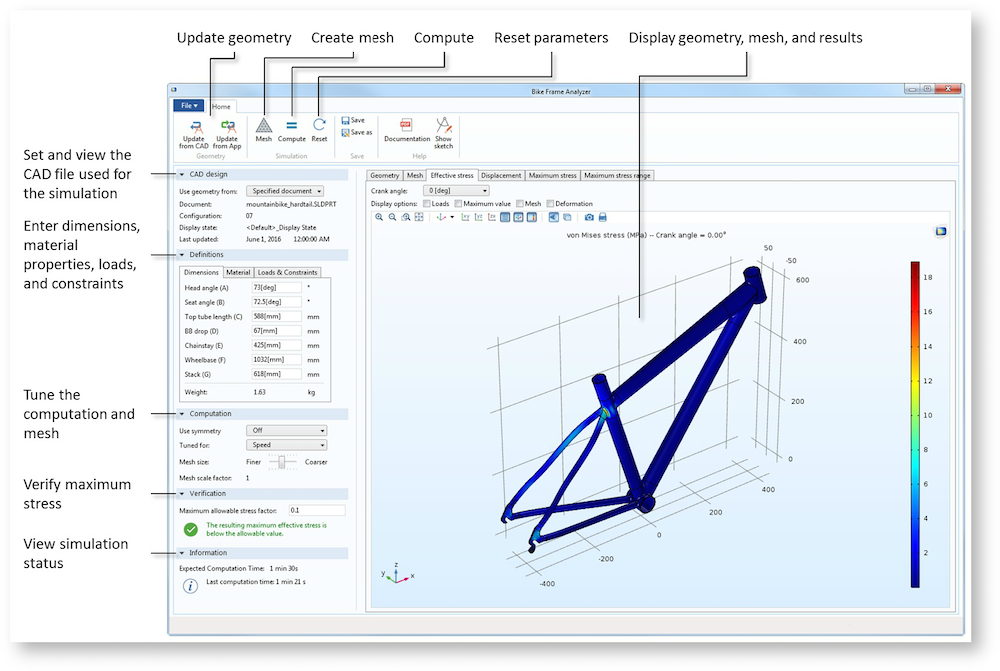
The UI of the Bike Frame Analyzer app.
During the development process, we may come up with many iterations of the frame design, which leads to many versions of the design file. Therefore, the file information of the current model geometry along with the date and time of the last update are always displayed in the CAD design settings section. By default, the Use geometry from option is set to Specified document to ensure that we connect to the correct SOLIDWORKS® file during a geometry update.
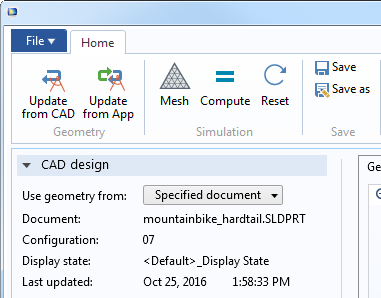
The CAD design settings section displays the time of the last geometry update and file information about the design.
To analyze a new SOLIDWORKS® file, configuration, or display state of a design, we can select the Active document option from the Use geometry from list before updating the geometry. This is possible when we configure the new SOLIDWORKS® file with similar user-defined parameters and selections to the mountainbike_hardtail.SLDPRT file that is included with the app. We will discuss this in more detail later.
We can update the geometry in two different ways, depending on whether we would like the dimension values entered in the app to be sent to SOLIDWORKS® or vice versa. Clicking on the Update from App button results in the former. In SOLIDWORKS®, the frame geometry is regenerated according to the received dimensions and sent back to the app. The second option leaves the geometry unmodified in SOLIDWORKS®. When we click the Update from CAD button, the current dimensions and geometry from the SOLIDWORKS® file carry over to the app instead and are reflected in the updated values on the Dimensions tab of the Definitions section. This method is useful when making changes directly in SOLIDWORKS® or when analyzing a completely new frame design.
Next, let’s dive into the physics setup in the underlying bike frame model.
Defining the Physics for the Underlying Bike Frame Model
Even though our model only concerns the frame of a bike, we need to take into account that loads are applied to components that are attached to the frame. For example, the weight of the rider is distributed on the seat and handlebar and the force resulting from the front wheel hitting the curb is transferred to the frame through the fork. These components can be approximated as rigid bodies in this simulation, but it is important that we apply the loads in the correct locations so that their contribution to the moment can be calculated.
The perfect tool for setting up these loads is the Rigid Connector boundary condition, available in the Solid Mechanics interface in the COMSOL® software. This is a type of kinematic constraint that keeps the faces it applies to as if they would be attached to a rigid body. With the Rigid Connector boundary condition, we can also apply forces at specified locations. The force’s contribution to the moment is automatically taken into account. With the rigid body assumption of the attached components, the simulation becomes a virtual test rig for bike frames.
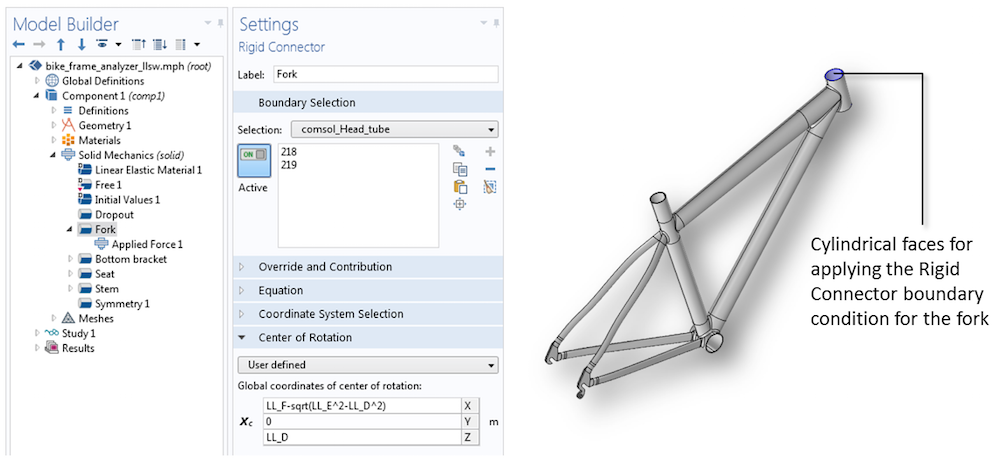
Screenshot of the COMSOL Multiphysics® software showing the Rigid Connector boundary condition, which is defined to constrain and apply the load on the fork.
As seen in the above figure, the fork’s load is applied to the rigid connector at its center of rotation, which is defined at the position of the front axle using the dimensional parameters for the frame synchronized from the SOLIDWORKS® design. The sketch below is included in the app to help the app users, who only need to enter the magnitude of the load and select the constraint that should be applied.
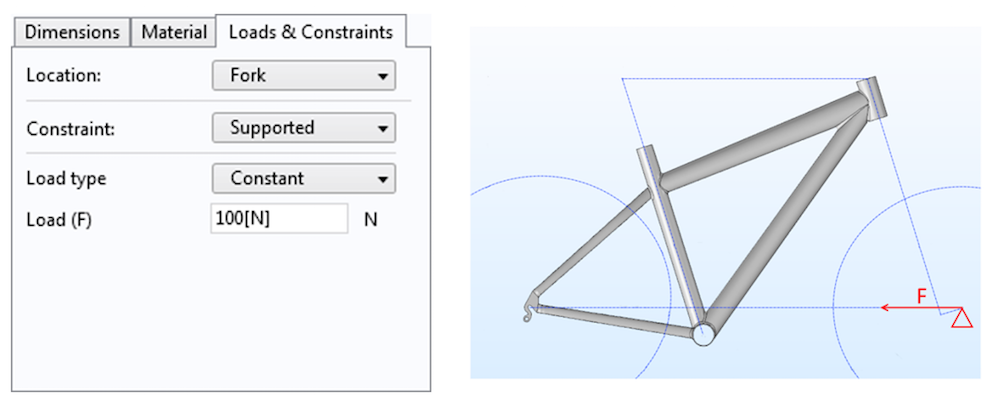
Settings for the load and constraint on the fork in the COMSOL® app.
Next, we’ll discuss how to implement the update of the SOLIDWORKS® geometry in the app.
Synchronizing Geometries with LiveLink™ for SOLIDWORKS®
The LiveLink™ for SOLIDWORKS® interface is the link between the geometry in the simulation app and the design in the SOLIDWORKS® software. In the model, this tool is represented by the first feature node in the geometry sequence, the LiveLink™ for SOLIDWORKS® node. In addition to the geometry, the LiveLink interface also keeps track and updates the dimensions and selections used for the physics boundary conditions. These are listed in the Settings window for the node and are important for setting up the simulation and changing the geometry from the app.
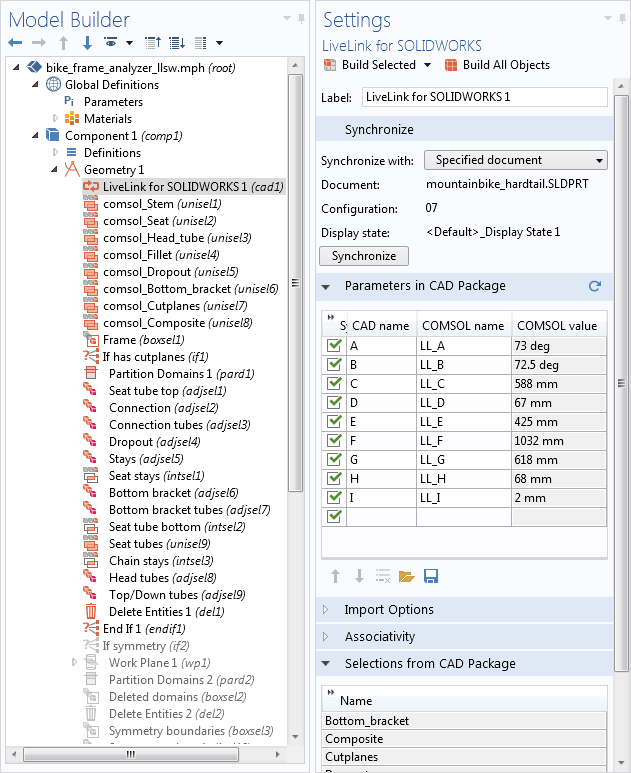
The geometry sequence of the model and the Settings window for the LiveLink™ for SOLIDWORKS® feature.
When a user clicks on either the Update from CAD or Update from App buttons in the app UI to update the geometry, a method is run that includes the command importData. This command corresponds to clicking on the Synchronize button in the Settings window for the LiveLink™ for SOLIDWORKS® node. In the Application Builder in COMSOL Multiphysics®, this command is in the synchronizeCAD method:
model.geom("geom1").feature("cad1").importData();
In the above command, the geom1 tag refers to the geometry sequence and the cad1 tag refers to the LiveLink™ for SOLIDWORKS® feature.
During synchronization, the interface also provides the file name, configuration, and display state of the synchronized CAD file. The file information is displayed in the Settings window of the LiveLink™ for SOLIDWORKS® feature. If the file has already been synchronized before, the interface ensures that the correct file and configuration is used as long as the CAD file is open in the SOLIDWORKS® software.
In the app, the synchronizeCAD method contains the commands where the synchronized file information is accessed. For example, the line
configuration = model.geom("geom1").feature("cad1").getString("configuration");
obtains the configuration for the synchronized design and assigns it to the string variable configuration.
In the same method, the command
model.geom("geom1").feature("cad1").set("synchronizewith", document_status);
configures the LiveLink™ for SOLIDWORKS® feature to synchronize either the previously synchronized file or a new file.
This is based on the setting of the document_status variable, which is tied to the Use geometry from combo box in the app’s UI. Valid values for the synchronizewith property are active and specified, where the former can be used to synchronize any file that is currently active in SOLIDWORKS®.
Connecting Model Parameters to the Frame Dimensions
We can update the bike frame dimensions in the SOLIDWORKS® file directly within the Bike Frame Analyzer app. To enable the update, each input field in the Dimensions tab in the app UI is connected to a global parameter in the model. These parameters are in turn connected via LiveLink™ for SOLIDWORKS® to global variables defined in the SOLIDWORKS® file. For example, the input field Head angle (A) has its source set to the LL_A global parameter, which we can find in the Model Builder in COMSOL Multiphysics® by going to the Global Definitions > Parameters node.
Parameters that start with LL_ are automatically generated and updated when needed by the LiveLink™ interface during synchronization. We can also find these parameters in the Settings window for the LiveLink™ for SOLIDWORKS® node, where the corresponding global variables in the SOLIDWORKS® file are also listed. For the LL_A parameter, the corresponding SOLIDWORKS® global variable is called A. In the SOLIDWORKS® UI, all user-defined global variables are in the Equations window.
Since a SOLIDWORKS® file may contain hundreds of dimension variables, both automatically generated and user defined, only those specifically selected are synchronized. Those that are synchronized are listed in the COMSOL Parameter Selection window, which we can open from the COMSOL Multiphysics tab in SOLIDWORKS®. In this window, we can also select new dimensional variables to include in the synchronization.

The COMSOL Parameter Selection window in the SOLIDWORKS® software. Parameters added to the lower table are synchronized.
Updating Parameters
Now that we have seen how the bike frame model’s parameters connect to the dimensions in the SOLIDWORKS® file, let’s take a look at the actual update process.
As already mentioned, we can update the geometry either based on the dimension values from the app or from SOLIDWORKS®, depending on which update button is selected. When the user clicks on the Update from App button, the frame dimensions change according to the values entered in the app interface. Under the hood, the synchronizeCAD method is run, particularly the command
model.geom("geom1").feature("cad1").importData();
This command, corresponding to the Synchronize button in the Settings window for the LiveLink™ for SOLIDWORKS® node, first sends the dimension values from the app to the SOLIDWORKS® software, where the corresponding user-defined global variables are updated, thus resulting in a rebuild of the geometry. After the rebuild is completed in SOLIDWORKS®, the geometry is sent back to the app.
During the second option for the geometry update, when the Update from CAD button is selected, both the app parameters and geometry are updated to reflect the current dimensions and geometry in SOLIDWORKS®. In this case, in the synchronizeCAD method, the command
model.geom("geom1").feature("cad1").updateCadParamTable(false, synchParam);
is run before the actual synchronization.
When the synchParam variable is set to true in the above command, the dimensional values retrieved from SOLIDWORKS® replace the parameter values in the app and are displayed in the app UI. During the subsequent synchronization, the SOLIDWORKS® geometry is not modified, since the dimension values in the COMSOL® app and the SOLIDWORKS® software are already the same.
Selections for Boundary Conditions
Assigning the appropriate geometric entity selections to the feature nodes in the underlying model is an important ability. These selections need to be maintained after changes to the CAD design, and even updated when an entirely new file is selected. One approach is to add selection input objects to the app interface in the Application Builder. This allows the user to inspect and make selections in the app after geometry updates. The Bike Frame Analyzer app, however, demonstrates a different approach, where the selections are made in SOLIDWORKS® using the selection functionality of LiveLink™ for SOLIDWORKS®.
The CAD file of the bike frame that is supplied with this demo app contains selections that have been defined on suitable faces to apply the boundary conditions. To view these selections, open the mountainbike_hardtail.SLDPRT file in SOLIDWORKS®. Then, on the COMSOL Multiphysics tab, click on the Selections button. The COMSOL Selections window that opens can be used to define selections.

COMSOL Multiphysics selections defined on the geometry in the SOLIDWORKS® software.
The selections are transferred to the COMSOL Multiphysics® software during a synchronization of the geometry and are listed in the Settings window for the LiveLink™ for SOLIDWORKS® node in the Model Builder. To view the selections, expand the Selections from CAD section. The selections are used as inputs to other operations further down in the geometry sequence. Finally, the output of those operations appears as the input selection for the rigid connector features in the Solid Mechanics interface in the COMSOL® software.
Setting up selections as outlined above makes it easy to work with the app. The LiveLink™ for SOLIDWORKS® interface takes care of the updates to the selections as the frame dimension is changed. Since the app relies on these selections being present in the model, there is code in the app to check that the selections exist after a geometry update. In the Application Builder, this code is included in the checkGeometry method:
String[] sel_CAD = model.geom("geom1").feature("cad1").outputSelection();
The command returns the list of selections transferred from the CAD file and stores it in the sel_CAD string array. Subsequent lines in the method compare the obtained selection names to the expected list and return an error if some are missing or incorrect.
System Requirements for Running COMSOL® Apps That Connect to CAD Software
We discussed one requirement for geometry updates: running the SOLIDWORKS® software with the CAD file open. In addition, SOLIDWORKS® needs to run on the same computer as the COMSOL client, where the COMSOL® app is open.
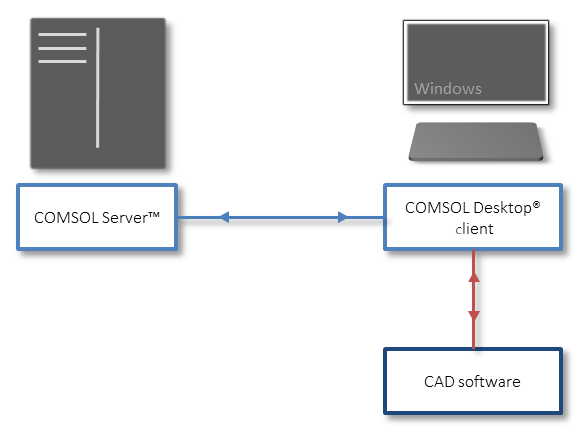
To synchronize geometries between CAD software and simulation apps, the CAD software and the COMSOL client need to run on the same computer.
The app itself runs on the COMSOL Server™ software, which can be installed on a remote computer, as illustrated above. The LiveLink™ for SOLIDWORKS® interface functionality for connecting to a CAD program comes with the COMSOL client, which can pass information to the app running on COMSOL Server™. However, working with any apps that require any of the LiveLink™ for CAD products is not supported in the web-based client.
Analyze Your SOLIDWORKS® Designs and CAD Files with the Bike Frame Analyzer App
To analyze your own frame design with the Bike Frame Analyzer app, you can add selections and global variables that make use of the same names.
First, set up user-defined global variables in SOLIDWORKS® with the same name as you find in the mountainbike_hardtail.SLDPRT app file. You also need to link these variables to the appropriate dimensions of the frame in the Equations window in SOLIDWORKS®. Next, enable the global variables for synchronization with the COMSOL Multiphysics® software from the COMSOL Multiphysics tab in SOLIDWORKS®. Click on the Parameter Selection button to open the COMSOL Parameter Selections window, where you can select all of the previously defined variables.
The last step of preparing the CAD file for synchronization is to define the selections with the names expected by the app. On the COMSOL Multiphysics tab in SOLIDWORKS®, click on the Selections button to open the COMSOL Selections window. Create new selections that are similar to those in the mountainbike_hardtail.SLDPRT file. Once finished, your design is ready for analysis with the Bike Frame Analyzer app.
Now that we’ve shown you how to analyze your own frame design, let’s see our Bike Frame Analyzer demo app in action…
Further Resources
- Browse the Video Gallery for a selection of tutorial videos on interfacing and app building:
- Check out the LiveLink™ for SOLIDWORKS® User’s Guide for more information on the interfacing product
SOLIDWORKS is a registered trademark of Dassault Systèmes SolidWorks Corp.


Comments (0)