
Realistic gear geometries are useful for multibody dynamics simulations when coupled with other physical phenomena. Rather than manually building these geometries, we can use built-in parts available in the Part Library. With these highly parameterized gear parts, we can build a wide range of parallel and planetary gear trains and learn how to use different aspects of the built-in parts to create a realistic gear model in the Multibody Dynamics Module.
The Benefits of Using Built-In Gear Parts
In principle, we can analyze mechanical devices with gears by explicitly including the contact interactions between gears as part of the simulation, but this method is computationally time consuming when performing a multibody dynamics analysis. Instead, we can implement a mathematical formulation to model the contact interactions between the gears.
With this formulation, we can include a realistic gear geometry, which provides accurate inertial properties when used in transient and frequency-domain studies. Realistic gear geometries from the Part Library can also be used to evaluate gear mesh stiffness in a static contact analysis and for multiphysics simulations. Note that the gear mesh stiffness is not analyzed through finite element analysis, but the stiffness of pairs of gear teeth are still in contact. Another benefit of having realistic gear geometries in a multibody dynamics analysis is that this provides better visualization when either setting up the physics or when postprocessing.
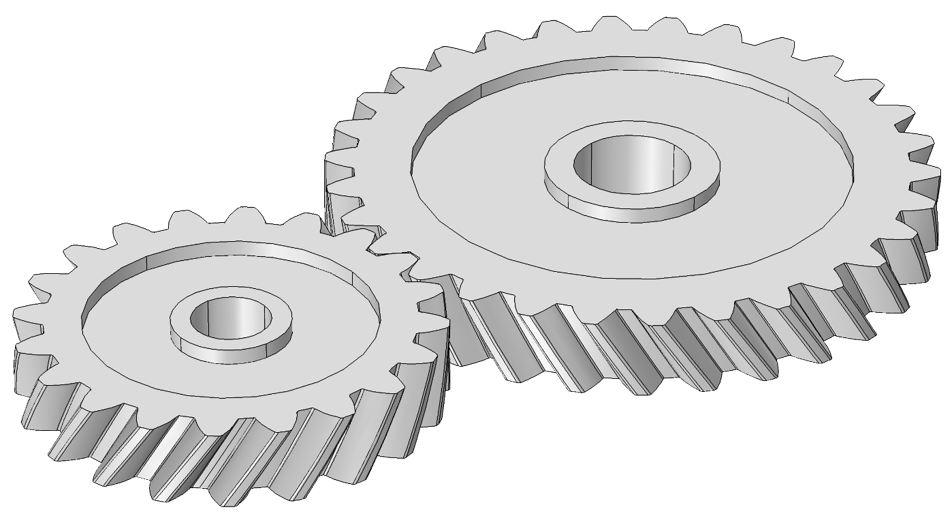
Geometry of a helical gear pair built using the Part Library.
We could manually build the geometry, but using built-in parts is both easier and faster. These parts are parametric in nature, which means that we can change their shape by readjusting the geometric parameters, and they come with optional features that can be added, such as shafts and fillets. The parts also have extensive checks to validate the input data as well as selections for the gear, shaft, and contact boundaries, therefore ensuring realistic physical entities and behavior. With the Part Library, it’s easy to specify the position and orientation of the gears as well as to align the gear mesh with their counterpart. These parts also contain robust geometric operations when creating complex gear geometries and the ability to manually change geometric operations.
The gear parts in the Part Library are divided into three categories based on whether they are gears with an external mesh, a gear with an internal mesh, or a rack. To learn more about the gear parts available in the Part Library, please read the previous blog post in our Gear Modeling series.
Building a Gear Train from Individual Gears
While the gear geometries in the Part Library are for individual gears or racks, gears are always used in pairs. Due to this, we need to build a gear train using individual gear parts. To illustrate the steps involved, we use a 2D spur gear pair example. The known quantities are as follows:
- Position of the first gear (x_1,y_1)
- Pitch radius of the first gear (r_1)
- Pitch radius of the second gear (r_2)
- Angular position of the second gear (\theta)
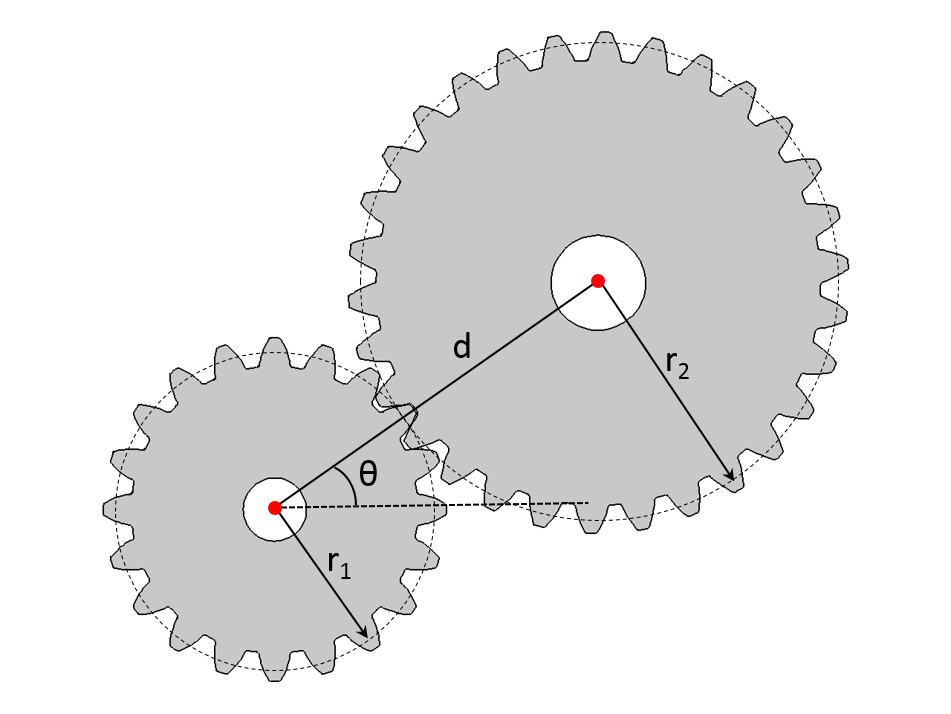
A spur gear pair showing the center distance of the two gears and the angular position of the second gear.
To place the second gear correctly, the first step is to compute the center distance (d):
The position of the second gear (x_2,y_2) can be defined as:
Once the second gear is placed at the correct location, the next step is to align the teeth, or in this case mesh, of both gears. To accomplish this task, rotate the second gear with a mesh alignment angle (\theta_a) defined as:
where \theta_{m1} and \theta_{m2} are the mesh cycle of both gears, and they are defined as:
where n_1 and n_2 are the number of teeth of the first and second gear, respectively.
After computing the position of the second gear as well as the mesh alignment angle, we enter them as either expressions or numbers in the input parameter fields of the second gear, as shown below:
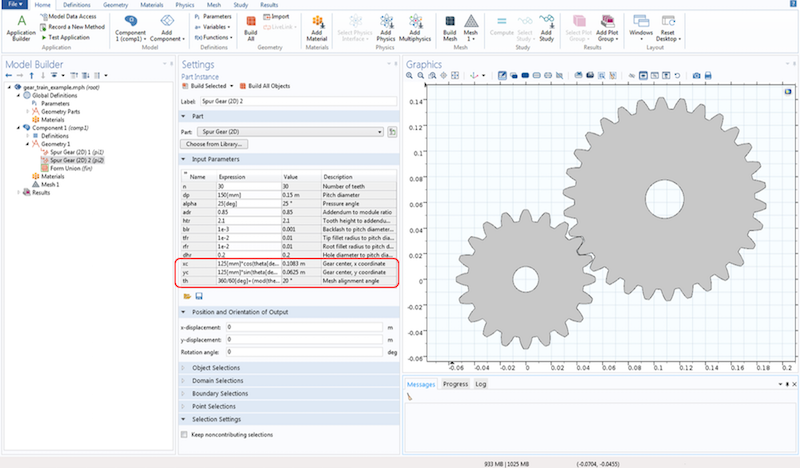
The input parameters of a 2D spur gear part with the gear center and mesh alignment angle highlighted.
Setting Up the Gear Tooth Parameters
For the gear tooth, we define the profile using an involute curve. The tooth shape and size are specific to the gear’s application, so a different application would require another type of gear tooth. Here is a list of input parameters through which we can control the shape and size of a gear tooth:
- Number of teeth (n)
- Pitch diameter (dp)
- Pressure angle (\alpha)
- Helix angle (\beta)
- Addendum-to-module ratio (adr)
- Tooth-height-to-addendum ratio (htr)
- Backlash-to-pitch-diameter ratio (blr)
- Tip-fillet-radius-to-pitch-diameter ratio (tfr)
- Root-fillet-radius-to-pitch-diameter ratio (rfr)
In the case that the fillet is not required in these places, we can set the tip or root fillet radius to zero.
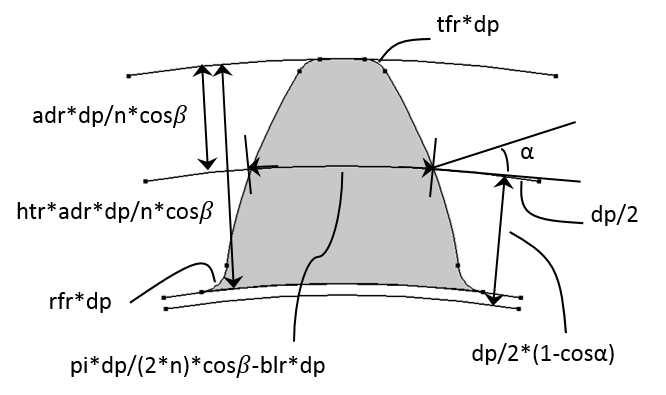
An external gear tooth showing various input parameters.
The input parameters are mostly relative quantities for better scalability. We can compute different tooth profile parameters in terms of these input parameters:
- Normal module: m = dp/n*cos\beta
- Addendum: ad = adr*m
- Tooth height: ht = htr*m
- Dedendum: dd = ht-ad
- Base diameter: db = dp*\cos\alpha
- Tip fillet radius: tf = tfr*dp
- Root fillet radius: rf = rfr*dp
- Tooth thickness at the pitch circle: t = \pi *m/2 -blr*dp
Some applications require a specific type of gear tooth. High-pressure angle gears are better for high-speed applications as their wear rate is less than that of a standard tooth profile. Similarly, backlash is needed in high-speed applications because it provides space for a film of lubricating oil between the teeth, which prevents overheating and tooth damage. On the other hand, backlash is not desirable in precision equipment, such as instruments, machine tools, and robots. Backlash in these devices causes lost motion between input and output shafts, making it difficult to achieve accurate positioning.

Gears for different pressure angles and modules. Left: Gear with a standard tooth profile. Middle: High-pressure angle gear. Right: High-module gear.
The Geometry of the Gear Blank and Shaft
After exploring the details of a gear tooth, we look at other parameters that influence the shape and size of a gear. The gear geometry is divided into three components: the gear teeth, gear blank, and shaft. For the gear shaft, the parameters are as follows:
- Gear-width-to-pitch-diameter ratio (wgr)
- Ring-width-to-gear-width ratio (wrr)
- Ring-outer-diameter-to-root-diameter ratio (dorr)
- Ring-inner-diameter-to-hole-diameter ratio (dirr)
Although the shaft is not an integral part of a gear, we can create one at the gear center with built-in gear parts. It is also possible to set the axial position of the gear on the shaft.
- Shaft-length-to-pitch-diameter ratio (lsr)
- Relative axial position of shaft center (zs)
By default, a gear is placed at the origin and its axis is set to the z-axis, but it’s possible to control the position and orientation of the gear using the following parameters:
- Gear center (\{xc, yc, zc\})
- Gear axis (\{egx, egy, egz\})
In order to align the gear mesh with the mating gear, we use a mesh alignment angle parameter to rotate the gear around its own axis.
- Mesh alignment angle (th)
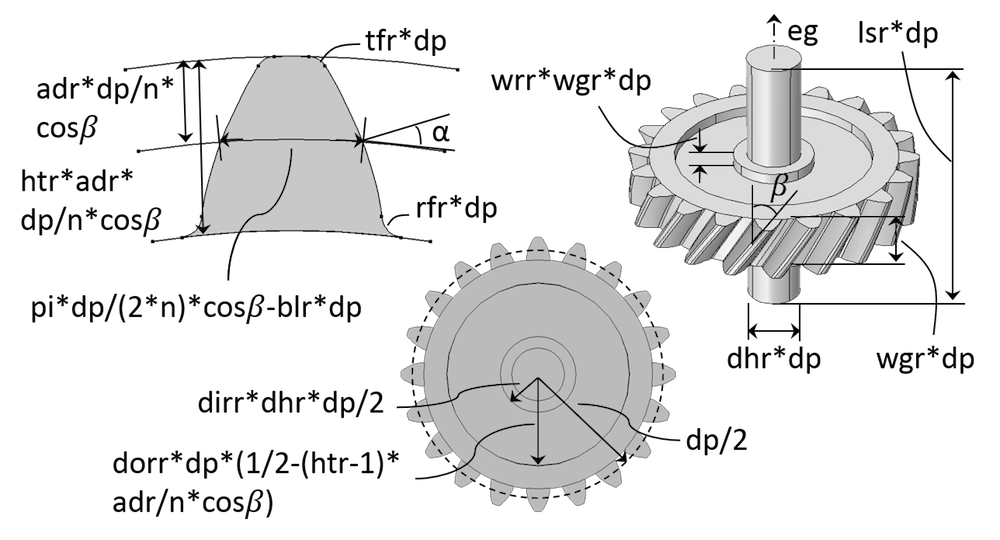
A helical gear geometry showing different input parameters.
These input parameters, like the ones for the gear tooth, are relative quantities that we can use to calculate the gear parameters. They are as follows:
- Gear width: wg = wgr*dp
- Ring width: wr = wrr*wg
- Ring outer diameter: dor = dorr*dr
- Ring inner diameter: dir = dirr*dh
- Shaft length: ls = lsr*dp
By default, a gear geometry comes with a set of features. Some of these are optional, and we can remove them by setting the appropriate input parameter to zero. It is possible, for example, to build a gear geometry without a shaft, gear blank ring, center hole, and fillets at the root and tip.
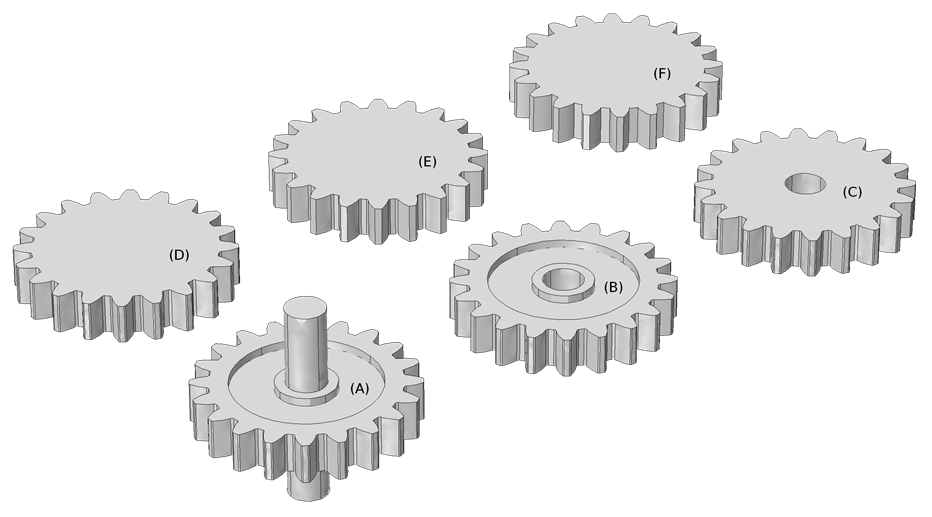
Geometry of spur gears where optional features are removed sequentially from (A) to (F). (A) Default geometry; (B) Without shaft; (C) Without gear blank ring; (D) Without center hole; (E) Without tip fillet; (F) Without root fillet.
While the gear blank shape is rather standard in all of the built-in gear parts, we can create a ring by removing the material in the gear blank. To customize the gear blank shape, we need to perform various manual geometric operations on the built-in parts.
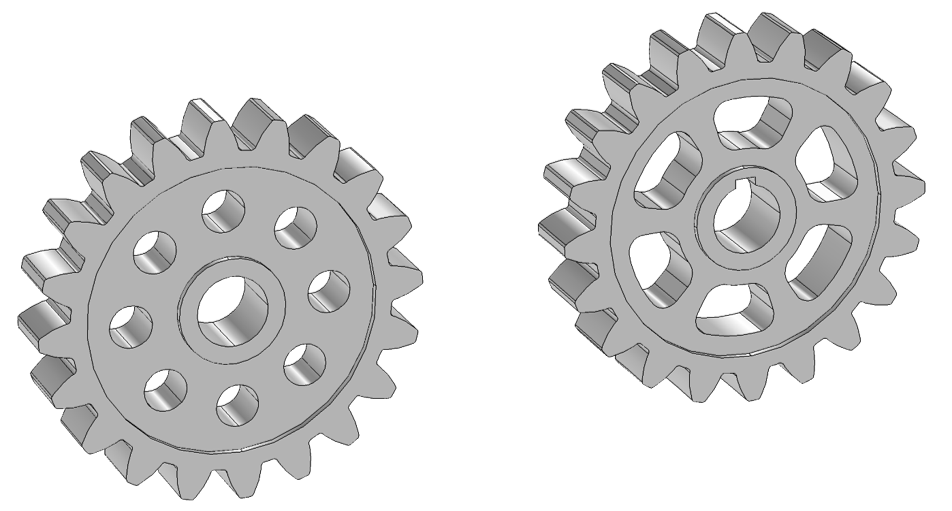
Gears with customized gear blanks.
Selections Provided by Gear Parts
The built-in gear parts provide selections that we can use when setting up the physics or postprocessing. The available selections are for different components of the gear as well as for the gear teeth boundaries. We can use these boundaries to model contact between the two gears.
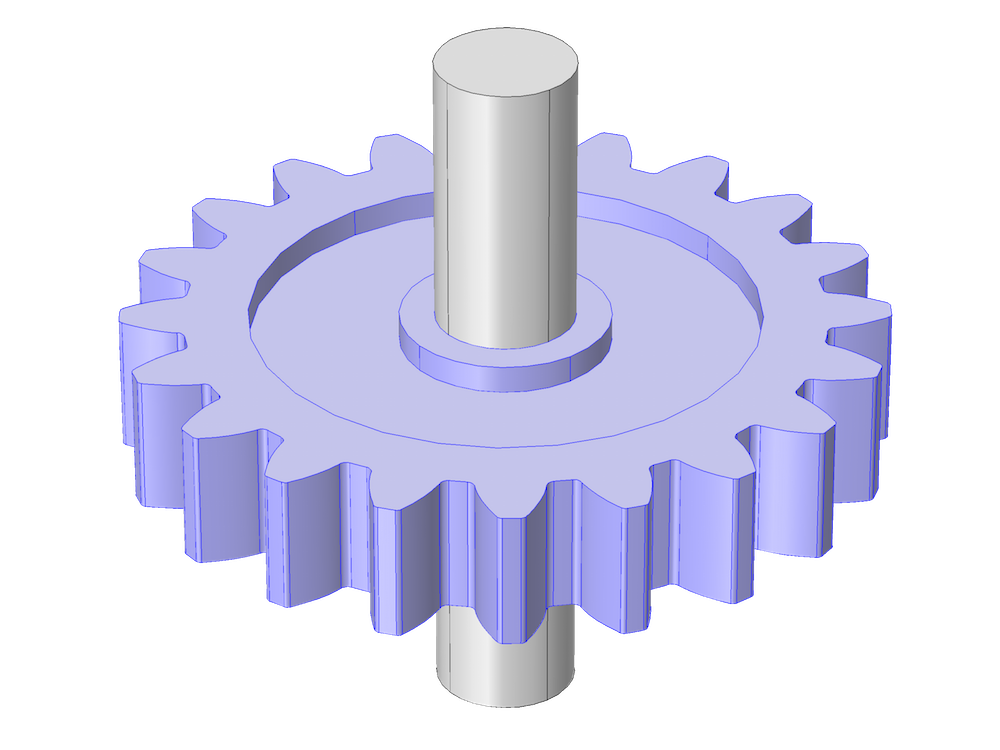
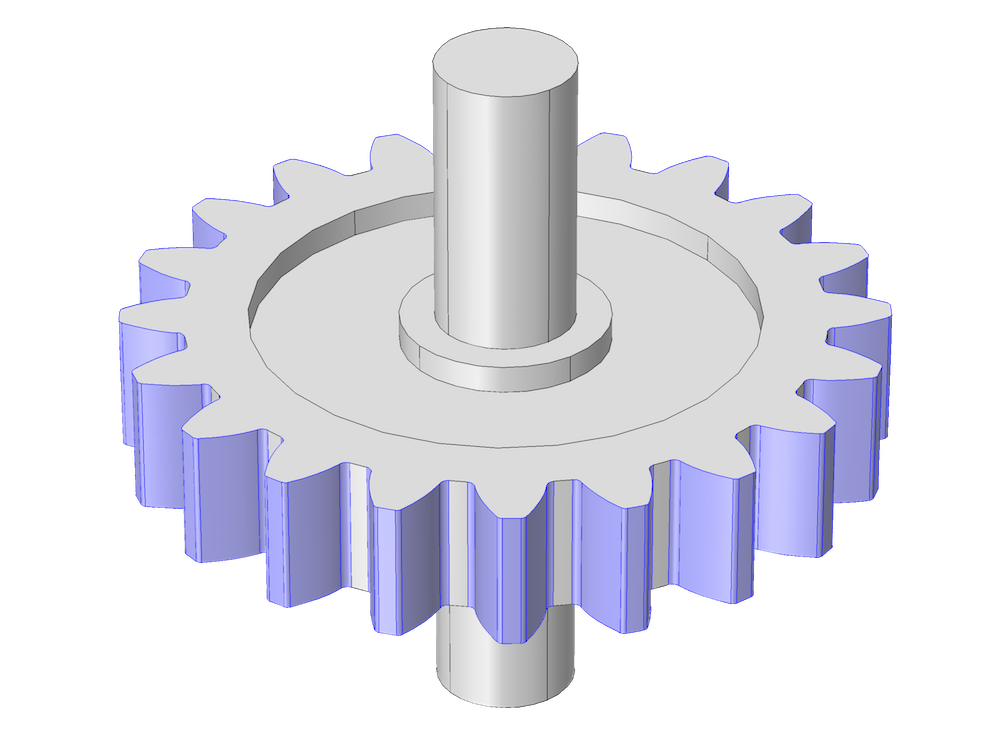
A spur gear where the geometry of the gear body, excluding the shaft, (left) and the gear teeth boundaries (right) are highlighted.
Checks to Validate the Input Data
Since the gear parts are highly parametric, it is important to have an extensive set of checks to validate the input data. These checks ensure that the input parameters are correct independently as well as when combined with other parameters. We perform these checks before proceeding to build the geometry.
In the case that the set of input parameters is invalid, an appropriate error message is displayed. A few examples of nontrivial geometry checks, an external gear for instance, are as follows:
- Addendum check: ad<=(dp-db)/2
- Dedendum check: (2*dd/dp)<=0.9
- Hole diameter check: dh<(dp-2*dd)
Next, we’ll look at some examples of gear geometries created using built-in parts.
A Differential Gear Example
The first example is a differential gear mechanism used in automobiles. This gear allows the left and right axles to rotate at different speeds. A differential gear uses five pairs of bevel gears, six bevel gears in total, to perform its operation.
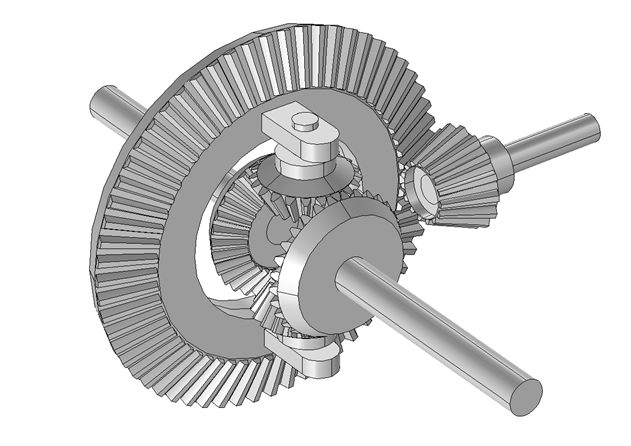
Geometry of a differential gear mechanism.
Three-Stage Wind Turbine Gearbox Example
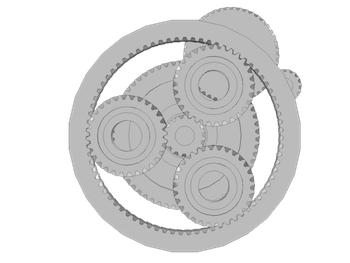
The next example is a three-stage wind turbine gearbox. The first stage is a planetary gear train, which has three planet gears, one sun gear, and one ring gear. The second and the third stages are parallel gear trains that each have a pair of gears. This gearbox uses eight pairs of helical gears, nine in total, to perform its operation. The typical gear ratio of this gearbox varies from 50 to 100.
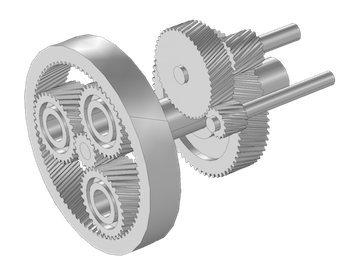
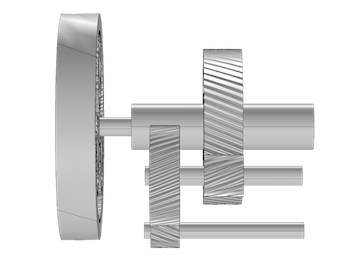
Geometry of a wind turbine gearbox with the top and front view showing.
Concluding Thoughts About the Built-In Gear Parts
Designed to transfer rotary motion from one shaft to another, gears are important devices in a variety of machines, from automobiles to wind turbines. New functionality in COMSOL Multiphysics provides you with several possibilities for quickly building gear geometries. With these robust and highly parametric built-in parts, you can change the shape of a gear to create an application-specific gear geometry.
In the next blog post in our Gear Modeling series, we’ll show you how to simulate gearbox noise and vibration. Stay tuned! We encourage you to browse the additional resources below in the meantime.
Learn More About Modeling Gears and the Multibody Dynamics Module
- Check out other blog posts in the Gear Modeling series
- Interested in multibody dynamics modeling? Read related posts on the COMSOL Blog
- Learn more about the new gear modeling features and functionality in COMSOL Multiphysics version 5.2a® by visiting the Release Highlights page


Comments (2)
ehsan nikkhah
August 16, 2019hello Mr. Soami
I want to spin an internal spur gear with a spur gear. but I don’t know what conditions of multibody physics I should have applied. please help me.
yours sincerely
Ehsan Nikkhah
Pawan Soami
August 19, 2019 COMSOL EmployeeDear Ehsan,
You can add two Spur Gear nodes; one having gear mesh set to internal whereas other having gear mesh set to external. To connect these two gears you can use a Gear Pair node.
Feel free to contact our Support team in case you need more details.
Best regards,
Pawan Soami