
Reports are valuable for documenting and showcasing results from your simulations. As of version 5.4, the COMSOL Multiphysics® software includes support for report templates, which you can use to create custom reports. In this blog post, we describe how to add report templates and show some examples of how they can be useful for creating reports with specific layouts and contents.
Reporting Your Simulation Results
Creating reports from your COMSOL Multiphysics simulations provides a way of documenting simulation setups and results. Reports also make it possible to distribute information about simulations to a wider audience. You can create reports in two formats:
- HTML: The HTML format is suitable for displaying a report in a web browser. You can customize the layout using a style sheet (CSS file) of your choice.
- Microsoft® Word: This format is suitable for printing and for extending the report with additional text and information. You can control the layout of the Word document using a custom Microsoft® Word template (*.dotx file).
Until version 5.4 of COMSOL Multiphysics, there have been three different predefined templates or levels for the contents of a report:
- Brief: A Brief Report contains an overview of the model with all results and plots but no details about the physics interfaces, solver settings, or variables.
- Intermediate: An Intermediate Report contains detailed information about the model, including the physics interface settings and variables, but not complete information about, for example, the underlying equations.
- Complete: A Complete Report contains comprehensive information about the model, including physics interface details such as weak equation expressions and shape functions.
These predefined templates provide different levels of detail, but they all report about every aspect of your simulation project. In addition, you can create a Custom Report, which is initially empty so that you can configure it freely using the available report components.
Creating Report Templates
The ability to add your own report templates makes it possible to generate reports that focus on a specific part of a simulation or that create images with a specific format, for example. To add a new template, right-click the Reports node and select Template. This creates an empty new template, which you can fill with the components that you want to include in the reports generated by the template.
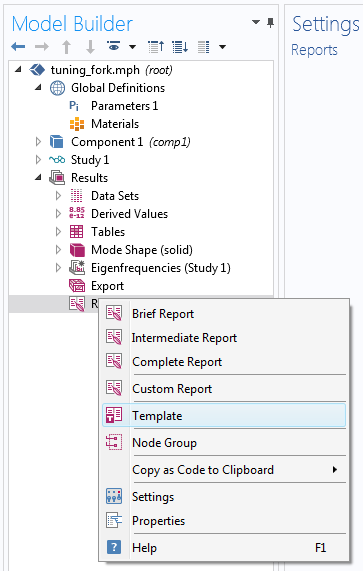
Adding a new report template in the Model Builder.
In the Settings window for the Template node, you can specify an output format and an accompanying style sheet or Microsoft® Word template file. You can also specify to use the initial settings for one of the predefined levels for added template components. If you click the Generate button, a template tree based on the selected level is created. This tree contains a node for every type of report node that appears when generating a report of the selected level. Its section structure reflects the model tree but has no effect on the generated reports. You can also add sections manually and fill them with the content-type nodes of your choice using the Section context menu. The Export and Export All buttons become available when the template is nonempty, and they export this template or all templates in the active model as MPH files.
The templates are stored as MPH files in your user directory. For example, if your username is paul, then a typical Windows® path for version 5.4 of COMSOL Multiphysics is C:\Users\paul\.comsol\v54\reporttemplates. To change an existing template, you can open and save such template MPH files like any other COMSOL Multiphysics MPH files. The saved templates become available as user-defined templates that you can choose via the From Template menu when you right-click the Reports node.
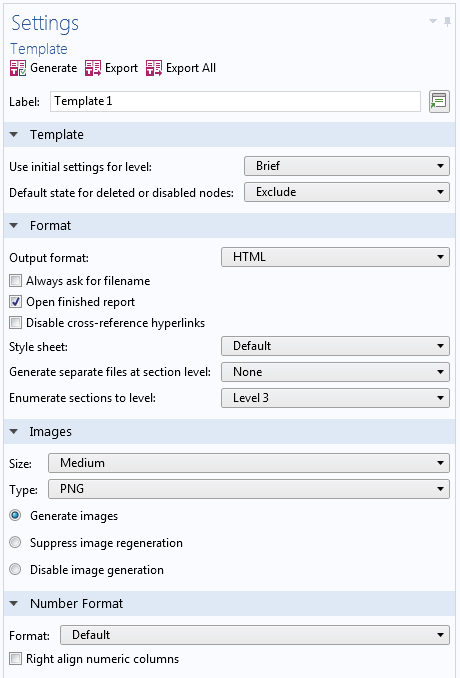
The Settings window for the Template node, where you can control the basic properties of a report template.
In the next sections, we will create two example templates.
Example 1: A Report Template for Physics Settings and Selections
You can create report templates starting from a blank model, but it is convenient to begin by opening a model that contains the types of nodes you want to include in the reports. One report template idea is to create a template for generating reports that only contain a graphical overview of all of the physics settings, such as boundary conditions, and their selections (with graphics that show their selections with highlighting and, in 2D, domain and boundary numbers).
To create such a report template, add a new Template node, where you can change the label to Physics Overview, for example. You can then proceed to add report contents for a top section with structural components (a title page and table of contents) and a second section with the desired overview of settings in the physics interfaces and, possibly, any multiphysics couplings. You can create this template in two ways:
- Adding the required report components individually
- Generating an initial report template using the initial settings for the predefined Brief report level and then removing the nodes that you do not need for this report template
In either case, the report template will contain the parts shown in the following screenshot.
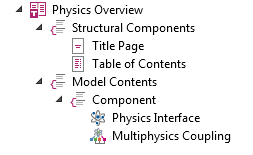
A report template for an overview of the physics settings. Under Model Contents, only the Physics Interface and Multiphysics Coupling parts are included.
To include the selections for all physics features, select the check boxes in the Settings window for the Physics Interface node according to the screenshot below.
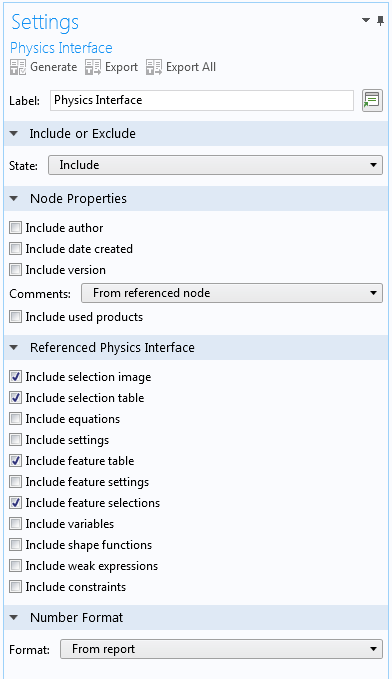
The settings for the Physics Interface node to include the selections and settings for all features.
Similarly, select only the Include selection image and Include selection table check boxes in the Settings window for the Multiphysics Coupling node.
To test your template, right-click Reports and choose From Template > Physics Overview, then click Preview All in the report’s Settings toolbar. Based on the output in the Preview window, you can go back and make adjustments to the template. To see their effects, return to the report you just created and click Generate. When prompted, answer Yes to replace the current report tree, then click Preview All again.
When you are satisfied with the result, you can save the template for future use. To do so, click the Export button at the top of the Settings window for the main Template node and give it a descriptive filename, such as PhysicsOverview.
You can now use the template to generate a report with the desired contents for any model of your choice. If the model geometry is a planar or axisymmetric 2D geometry, select the Show geometry labels check box in the Settings window for the View node under the 2D Component node to include numbers in the selection plots for the domain numbers, boundary numbers, and point numbers. The following screenshot shows a part of the preview for a report generated using this report template. The part shows the domains, with their domain numbers, where the Electromagnetic Waves, Frequency Domain interface is active.
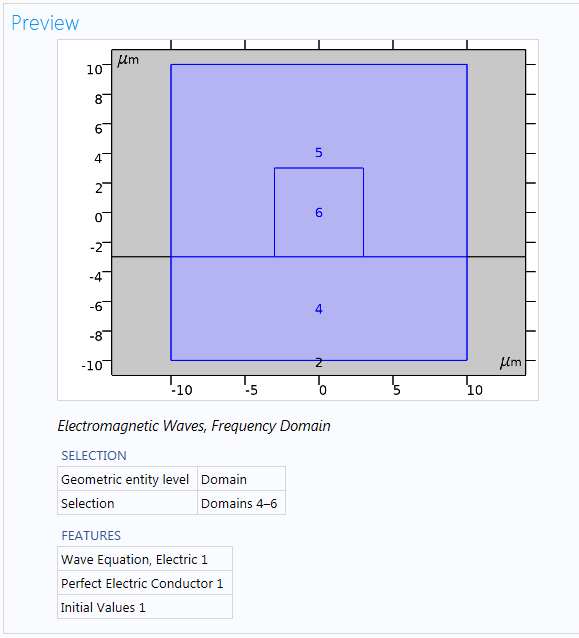
Preview of a report, using the Physics Overview report template, for the Stress-Optical Effects in a Photonic Waveguide example from the Application Library for the Structural Mechanics Module, an add-on to COMSOL Multiphysics.
Example 2: A Report Template for Result Plots
Another report template idea is to create a template for a report that only contains derived values, tables, evaluation groups, and result plots and that uses extra large images. Such a report could be useful for result presentations. To create this report template, add a new Template node, where you can change the label to Results Only, for example. You can then proceed to add report contents for a top section with structural components (a title page and a table of contents) and a second section with the desired contents from the results part of the simulation. You can create it in the same ways as in the report template example discussed above.
This report template will contain the parts shown in the following screenshot.
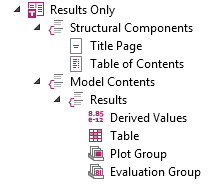
A report template for reporting results. Under Model Contents, only some parts under Results are included.
To get large and focused result plots, make the following changes to the report settings:
- In the Settings window for the main Template node (renamed as Results Only), select Extra large from the Size list in the Images section to create a report with the largest possible result plots.
- In the Settings window for the Plot Group report node, select the Zoom extents check box to make sure that the result plots fill the images (see the screenshot below).
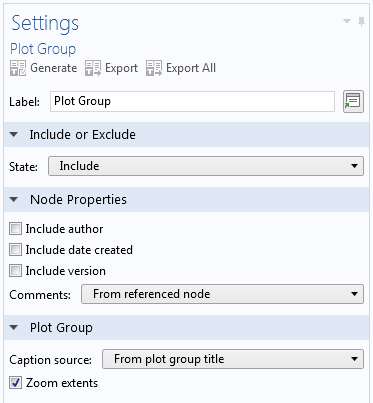
The Settings window for the Plot Group report node. Here, the Zoom extents check box has been selected to make the plots fill the images.
To save this template for future use, click the Export button at the top of the Settings window for the main Template node and give it a descriptive filename, such as ResultsOnly.
You can then use the report template to generate a report with the desired contents for any model of your choice. The following screenshot shows a part of the preview for a report generated using this template, displaying a result plot.
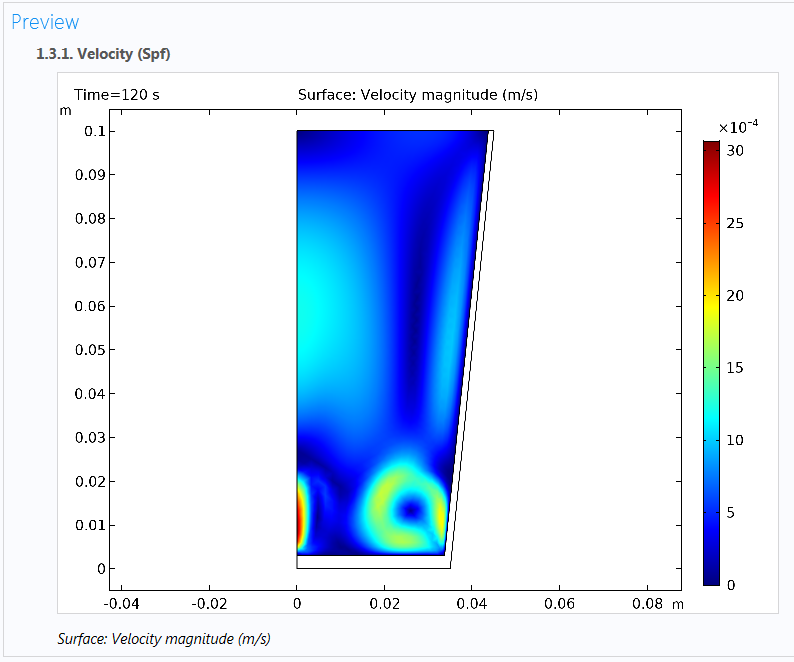
Preview of a report, using the Results Only report template, for the Free Convection in a Water Glass model from the Application Library for the Heat Transfer Module, an add-on to COMSOL Multiphysics.
Next Steps
If you are interested in using the template examples above to report your simulation setups and results, try them out. You can also experiment with the report template settings to modify the templates, as there are many more settings for customizing a report. Over time, you might build a library of custom report templates, which you can use over and over for all of your future simulation projects.
Take a look at the following resources to learn more about the postprocessing and report capabilities of the COMSOL® software:
- Watch a two-minute video on creating and exporting model reports
- Read this blog post on useful tools for postprocessing
- Find out how to export your 3D result plots as glTF™ files on the COMSOL Blog
Microsoft is a registered trademark of Microsoft Corporation in the United States and/or other countries.


Comments (0)