
When performing a noise, vibration, and harshness (NVH) analysis of a transmission system, the elasticity of the gear mesh plays a crucial role in obtaining useful results. To help you create an accurate gear simulation, new features and functionality in the COMSOL Multiphysics® software enable you to evaluate gear mesh stiffness. Today, we’ll explain why it’s important to account for gear mesh elasticity as well as how to compute and include gear mesh stiffness in your multibody dynamics model.
The Importance of Gear Mesh Stiffness
Before the invention of gears, people used wheels to transfer the rotation of one shaft to another with the help of friction. The major drawback in using these frictional wheels was the slippage beyond a certain torque value, as the maximum torque that could be transmitted was limited by the frictional torque. To overcome this limitation, people began using toothed wheels, more commonly known nowadays as cogwheels or gears.
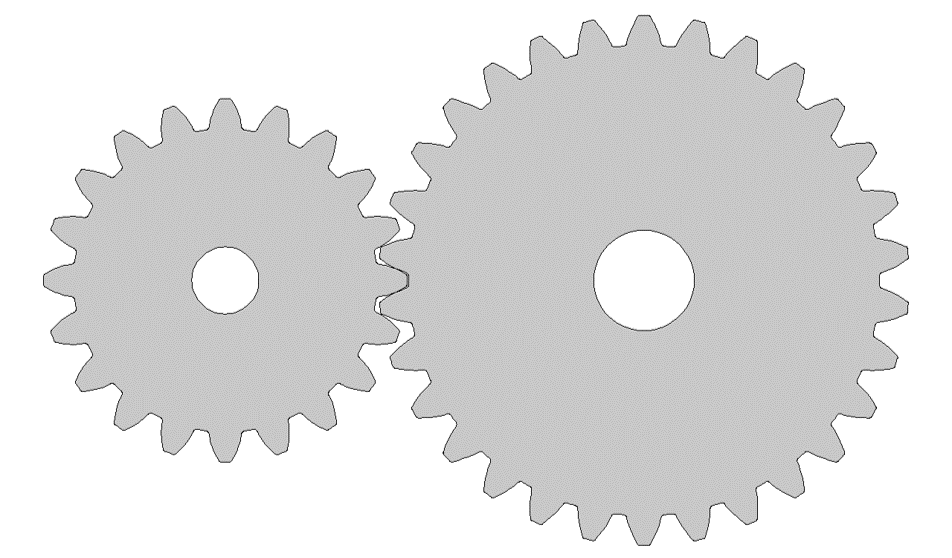
Gear pair created using the Parts Library in the Multibody Dynamics Module.
The main purpose behind gears is to avoid slippage. This is why the teeth of one gear are inserted between the teeth of the mating gear, a process referred to as gear meshing. Compared to the gear’s core region, the gear’s mesh region is more flexible. Hence, accounting for the stiffness of the gear mesh is important when trying to accurately capture the dynamics and vibrations in the system.
Gear mesh stiffness depends on several different parameters and, most importantly, it varies with the gear rotation. This makes the problem nonlinear, and the continuously varying gear mesh stiffness gives rise to vibrations in the system. These vibrations in different parts of the transmission system result in noise radiation. Therefore, it is crucial to evaluate gear mesh stiffness and include it in the gear model.
Evaluating Gear Mesh Stiffness Using Static Contact Analysis
To examine gear mesh stiffness, we assume that the gears are elastic bodies and model the contact between them. We then perform a stationary parametric analysis to determine the mesh stiffness of the gears for different positions in a mesh cycle. A mesh cycle is defined as the amount of gear rotation after which the next tooth takes the position of the first one.
Now, to understand this process, let’s take an example in which two gears, both made of steel, have the following properties:
| Properties | Pinion | Wheel | |
|---|---|---|---|
| Number of teeth | n | 20 | 30 |
| Pitch diameter | dp | 50 mm | 75 mm |
| Pressure angle | a | 25° | 25° |
| Gear width | wg | 10 mm | 10 mm |
In this example, both gears are hinged at their respective centers. Using the penalty contact approach, we model the contact between the teeth of the two gears. The boundaries of the two gears in contact with each other are shown below. For more details about how to set up this model, you can check out the tutorial titled: Vibrations in a Compound Gear Train.
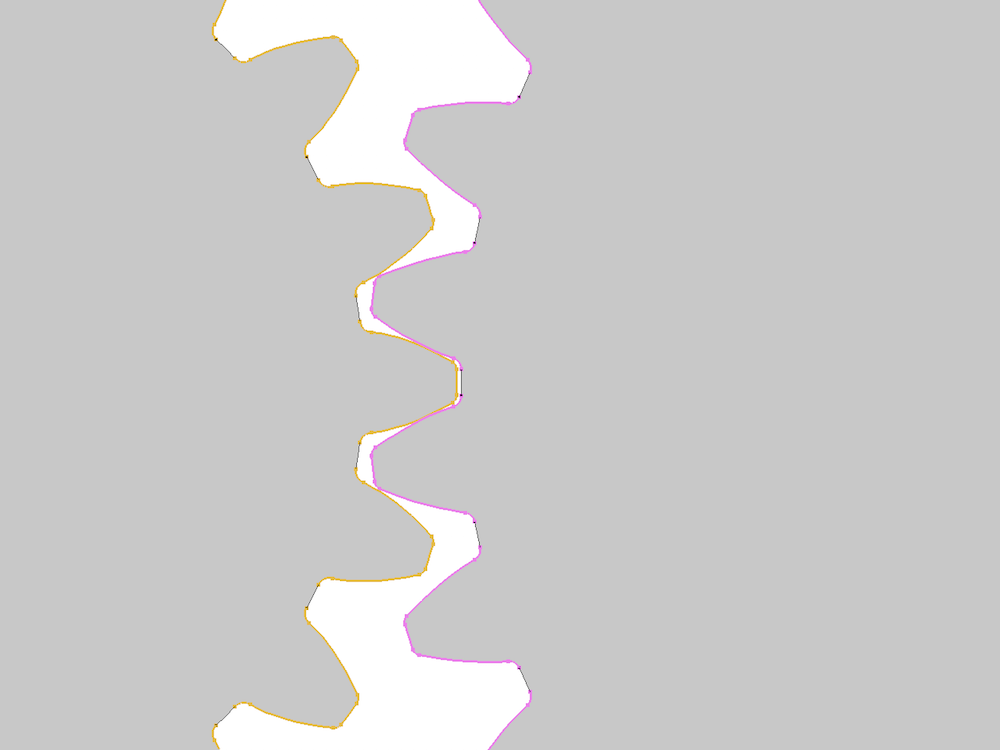
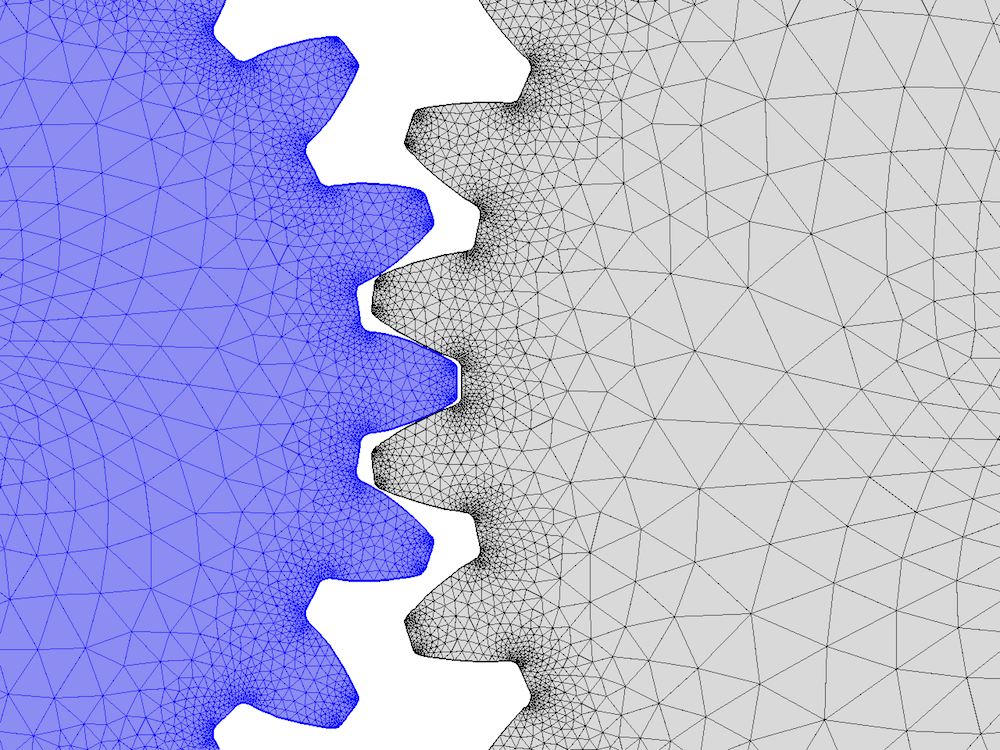
The contact pair boundaries (left) and the finite element mesh (right) in the gear pair.
Because the mesh stiffness changes for the gears’ different positions in the mesh cycle, we rotate both gears parametrically to compute the variation of gear mesh stiffness. The rotation of the pinion (θp) about the out-of-plane axis is prescribed in such a way that the pinion rotates for two mesh cycles. The rotation of the wheel (θw) about the out-of-plane axis is defined as the following:
where gr is the gear ratio with a value of 1.5 and θt is the twist with a value of 0.5°.
The wheel is given a twist, θt, and the required twisting moment, T, is evaluated on the hinge joint. Hence, the torsional stiffness of the gear pair is prescribed as:
Once we know the torsional stiffness, we can define the stiffness along the line of action as:
where dpw is the pitch diameter of the wheel and α is the pressure angle.
The von Mises stress distribution in the gear pair for different positions in a mesh cycle. This shows high stress levels at the contact points along the line of action.
The figure below shows the variation of computed gear mesh stiffness with the rotation of the pinion for two mesh cycles. We can see that the gear mesh stiffness is periodic in each mesh cycle as well as across multiple mesh cycles, increasing in the beginning and then later decreasing. This happens due to the changing contact ratio. In the beginning of a mesh cycle, the contact ratio increases from 1 to 2, but then drops back down to 1.
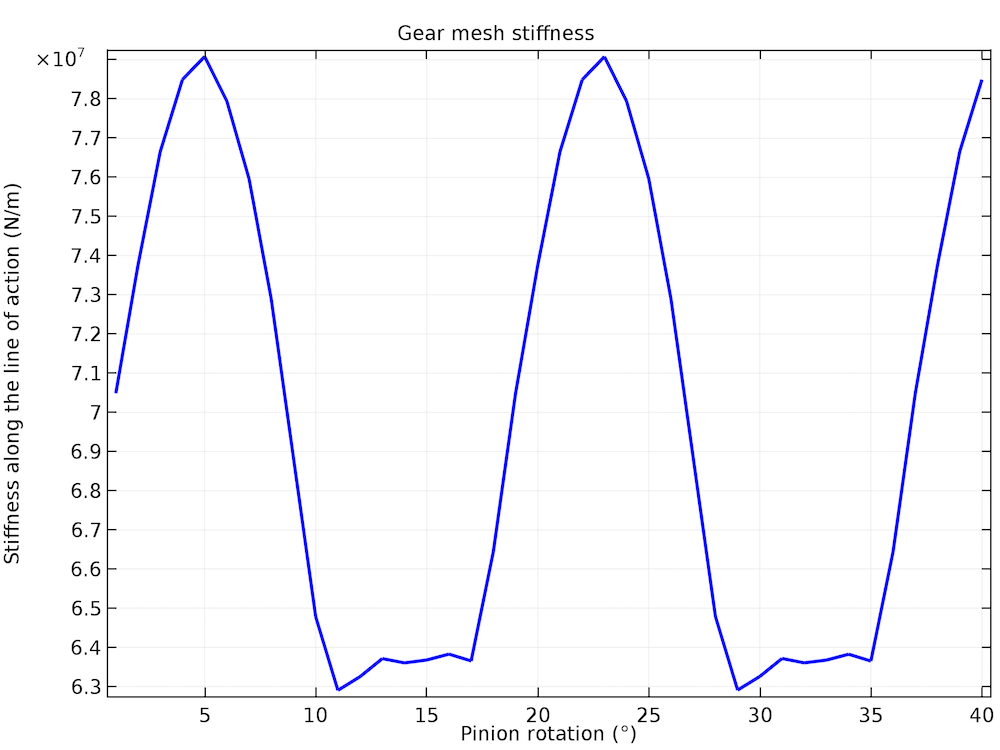
The variation of gear mesh stiffness with the pinion rotation.
Dependence of Gear Mesh Stiffness on Different Parameters
In the previous section, we saw that gear mesh stiffness varies with the gear’s position in the mesh cycle. It also depends on several other parameters, some of which are listed here:
- Tooth parameters
- Number of teeth or module
- Pressure angle (angle between the tooth face and the gear wheel tangent)
- Addendum (radial distance from the pitch surface to the outermost point of the tooth)
- Geometric parameters
- Pitch diameter
- Width
- Material properties
Let’s focus on investigating the effect of gear tooth parameters on the mesh stiffness. While doing so, we keep the same geometric and material properties that were given in the first table.
Case 1: The Effect of the Number of Teeth or Module on Mesh Stiffness
To look at the effect of the number of teeth or module on gear mesh stiffness, we consider different values for the number of teeth on the pinion.
- Number of teeth on the pinion: np = 20, 28, 36
We then compute the number of teeth on the wheel by using the gear ratio, which is set to 1.5. The other two gear tooth parameters are fixed to the following values:
- Pressure angle: α = 25°
- Addendum-to-pitch-diameter ratio: adr = 0.6
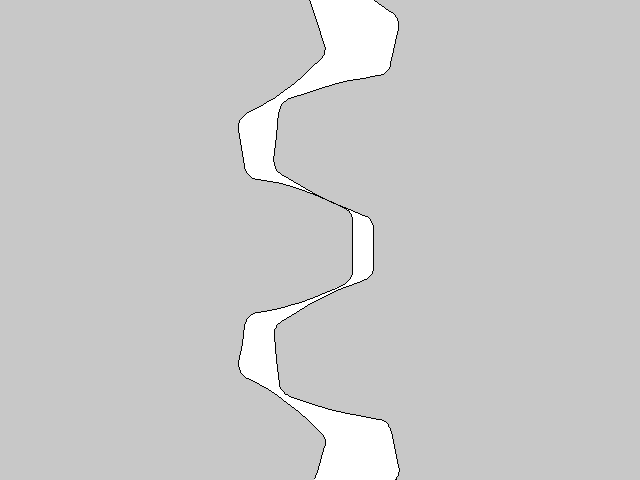
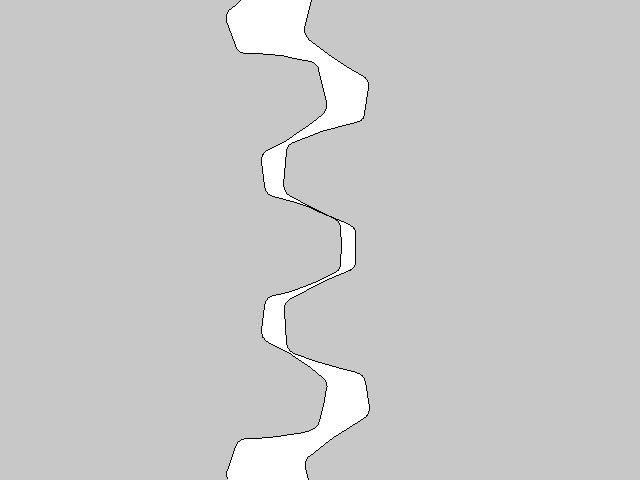
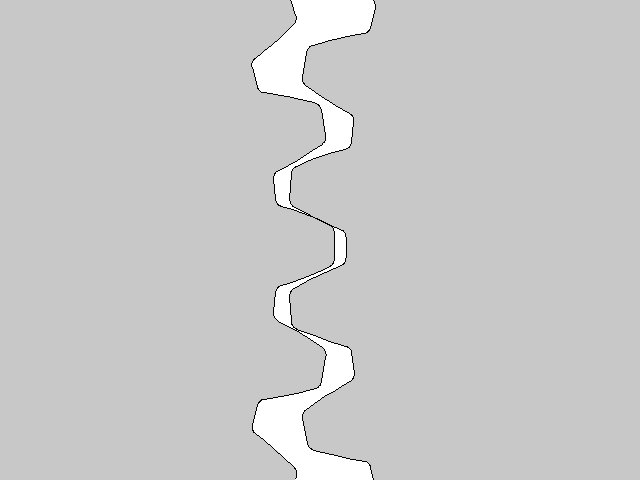
Gear meshes for three different values of the number of teeth (np = 20, 28, 36).
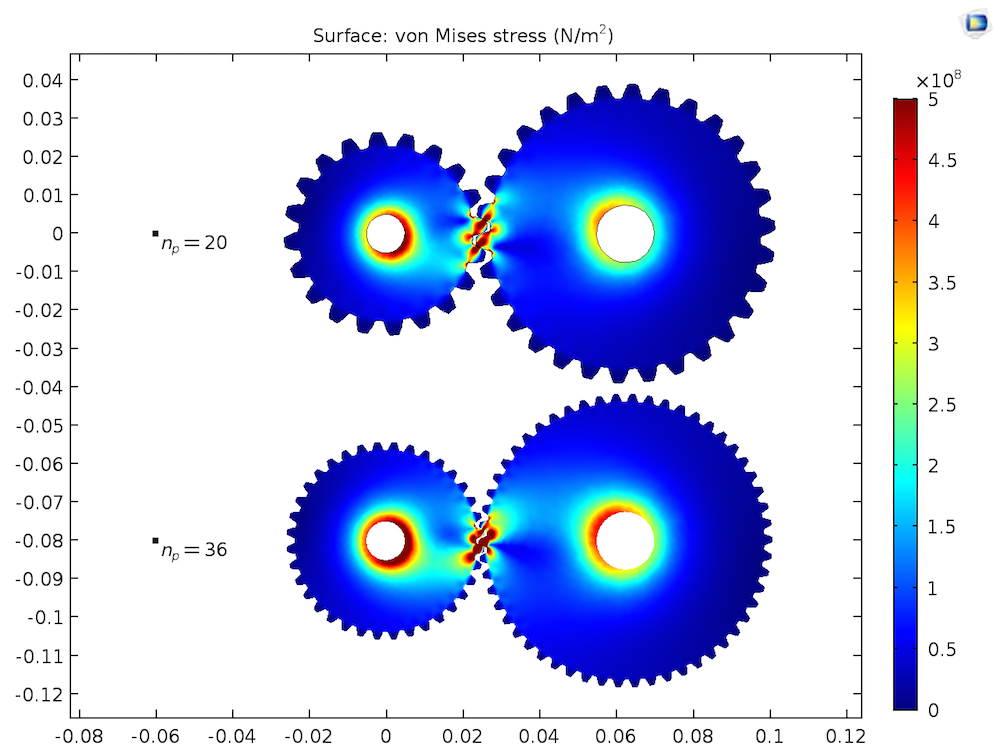
The von Mises stress distribution in the gear pair for different values of np.
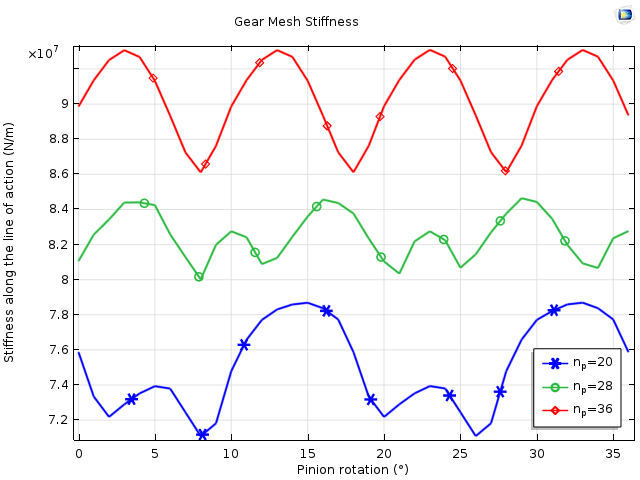
The variation of gear mesh stiffness with pinion rotation for three different values of the number of teeth (np = 20, 28, 36). The stiffness is comparatively higher and smoother for a greater number of teeth or for a smaller module.
Case 2: The Effect of Pressure Angle on Mesh Stiffness
To understand the effect of pressure angle on gear mesh stiffness, we look at three different values of the pressure angle.
- Pressure angle: α = 20°, 25°, 35°
The other two gear tooth parameters are fixed to the following values:
- Number of teeth on the pinion: np = 20
- Addendum-to-pitch-diameter ratio: adr = 0.6
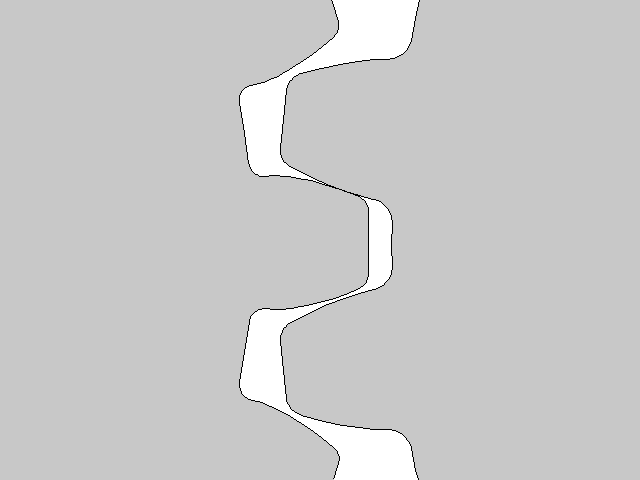

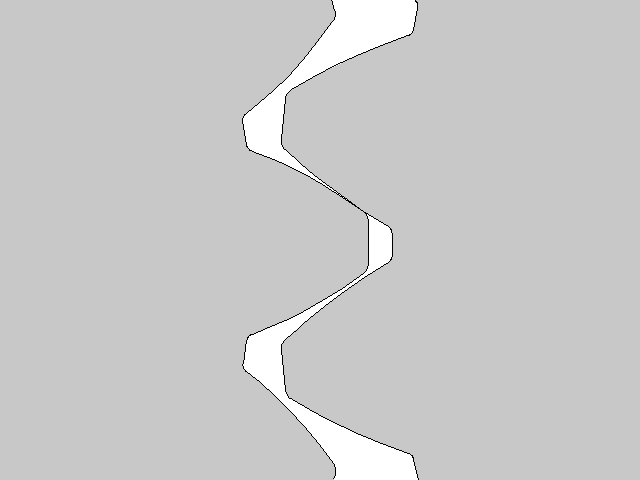
Gear meshes for three different values of the pressure angle (α = 20°, 25°, 35°).
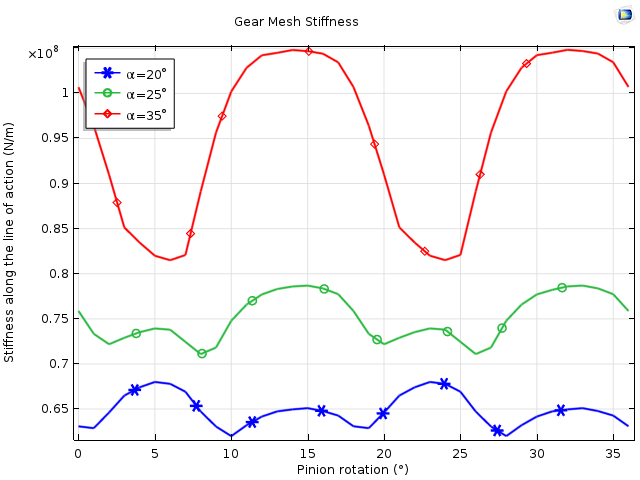
The variation of gear mesh stiffness with pinion rotation for three different values of the pressure angle (α = 20°, 25°, 35°). The stiffness increases with a larger pressure angle.
Case 3: The Effect of the Addendum-to-Pitch-Diameter Ratio on Mesh Stiffness
After investigating the effects of module and pressure angle, we now examine the effect of different addendum values on gear mesh stiffness.
- Addendum-to-pitch-diameter ratio: adr = 0.6, 0.75, 0.9
The other two gear tooth parameters are fixed to the following values:
- Pressure angle: α = 25°
- Number of teeth on the pinion: np = 20
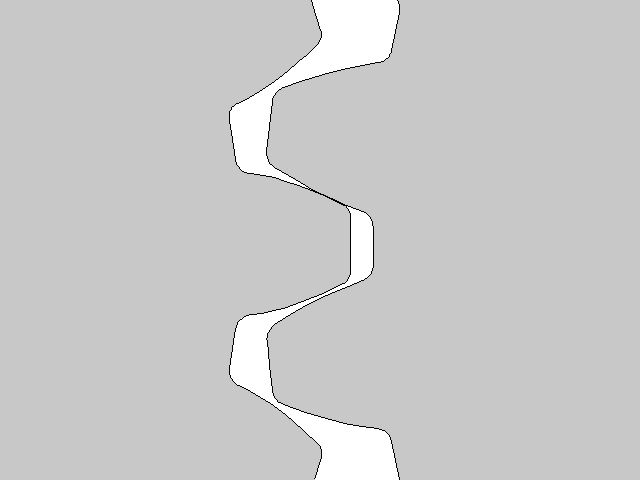
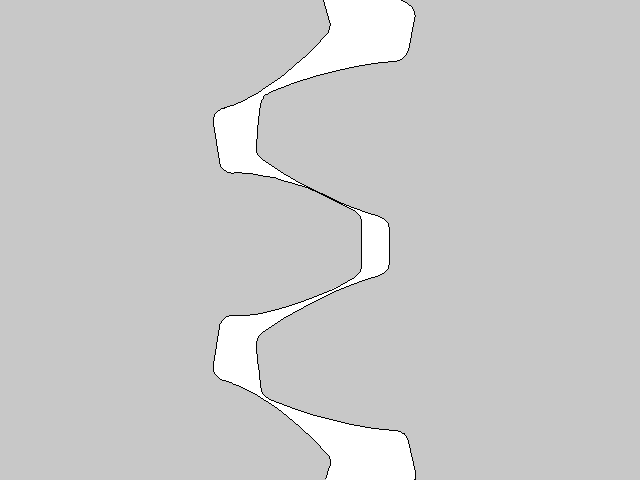
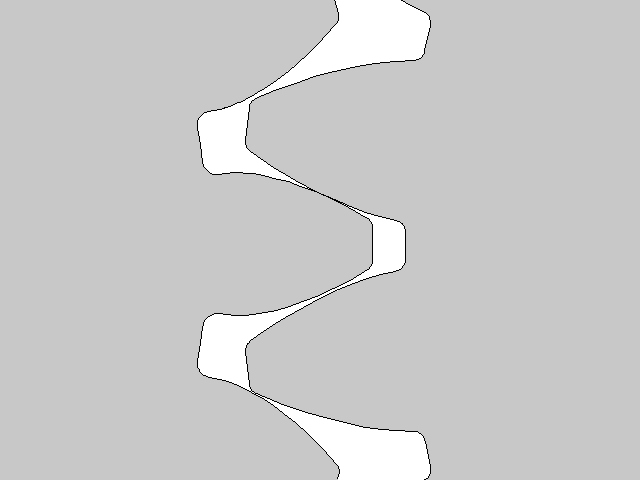
Gear meshes for three different values of the addendum-to-pitch-diameter ratio (adr = 0.6, 0.75, 0.9).
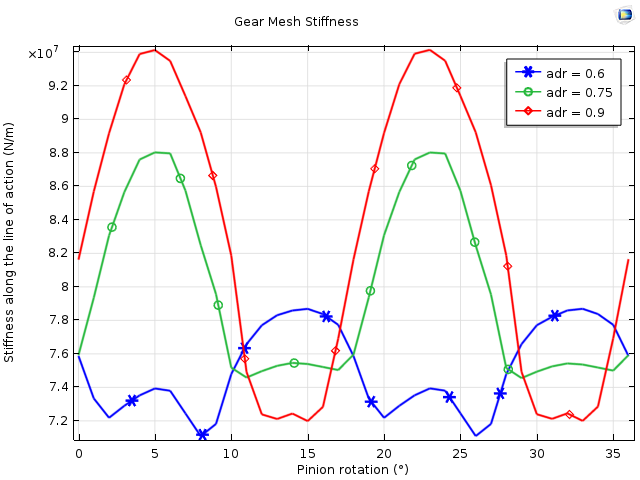
The variation of gear mesh stiffness with pinion rotation for three different values of the addendum-to-pitch-diameter ratio (adr = 0.6, 0.75, 0.9). The stiffness is comparatively higher for higher values of addendum, however it also has more fluctuations. This may lead to higher vibration levels in the transmission system.
Including Gear Mesh Stiffness in a Multibody Dynamics Analysis
After evaluating gear mesh stiffness using the static contact analysis, the next step is to include the stiffness in the gear model so that we can perform an NVH analysis of the full transmission system.
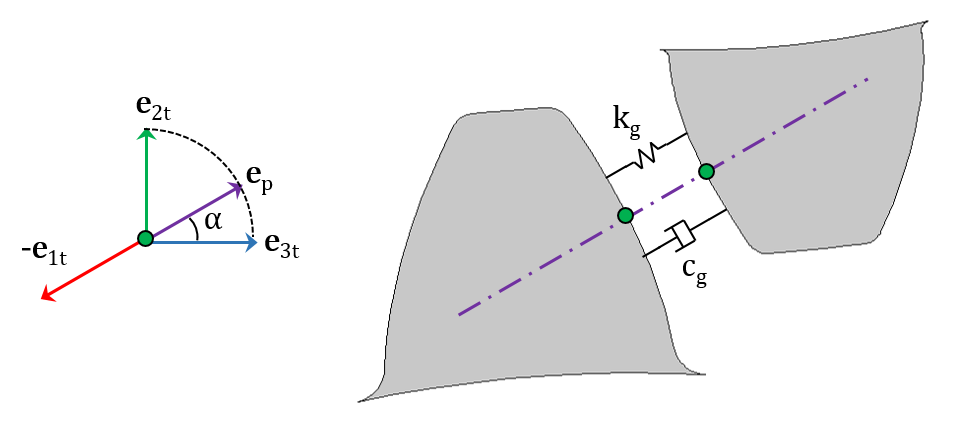
The gear mesh stiffness and damping added along the line of action between the two gears.
In the multibody dynamics analysis, we use the evaluated gear mesh stiffness in the Gear Elasticity node under the Gear Pair node. In this analysis, we write gear mesh stiffness as a function of gear rotation. By default, gear mesh stiffness is assumed periodic in a mesh cycle. However, it is also possible to assume that it is periodic in a full revolution.
In order to dampen the vibrations, we can add gear mesh damping in the Gear Elasticity node. This can be entered either as a function of mesh stiffness or explicitly. The latter technique works well when we have the gear-mesh stiffness variation available. If we don’t have the exact gear-mesh stiffness variation, we can use the gear tooth stiffness for the wheel as well as the pinion. The tooth stiffness can simply be evaluated by applying a load on the gear tooth and measuring the deflection. The gear tooth stiffness is also the function of a mesh cycle, although as an approximation, and we can enter it as a constant average value.
Finding the overall gear mesh stiffness also requires determining the contact ratio. In simple words, the contact ratio can be defined as a measure of the average number of teeth in contact during the period in which a tooth comes and goes out of contact with the mating gear. To show how different values of the contact ratio affect the stiffness, let’s examine a few cases.
Case 1: The Contact Ratio Is 1
In the first case, only a single pair of teeth is in contact for all positions in the mesh cycle. The typical variation of the gear tooth stiffness is shown below.
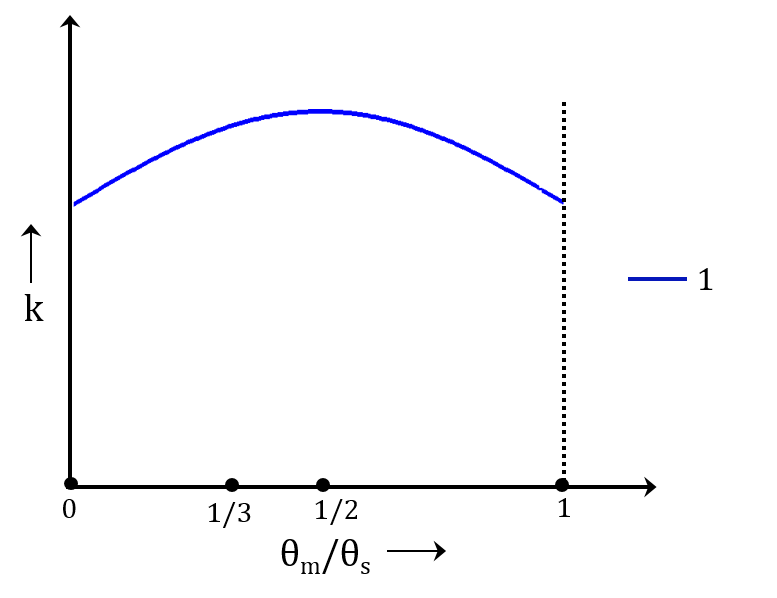
The typical variation of the gear tooth stiffness for the pair of teeth in contact.
Case 2: The Contact Ratio Is 2
In this case, two pairs of teeth are in contact for all positions in the mesh cycle. We can see from the following image that except for a phase difference, the second pair of teeth has the same stiffness as that of the first pair. The total stiffness of the gear mesh is the summation of individual tooth stiffness.
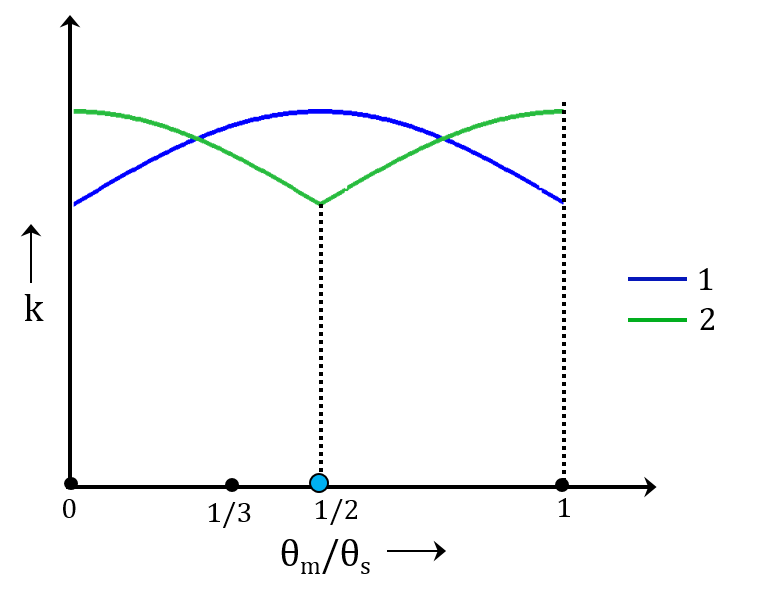
The typical variation of the gear tooth stiffness for the first and second pair of teeth when the contact ratio equals 2.
Case 3: The Contact Ratio Is Between 1 and 2
In the third case, the pairs of teeth that are in contact change for different positions in the mesh cycle. For certain positions, there is only one pair of teeth in contact, whereas in other positions, there are two pairs of teeth in contact. The stiffness of the second pair of teeth goes to zero when it loses contact for certain positions in the mesh cycle. This results in large fluctuations in the overall gear mesh stiffness, which leads to vibrations in the system.
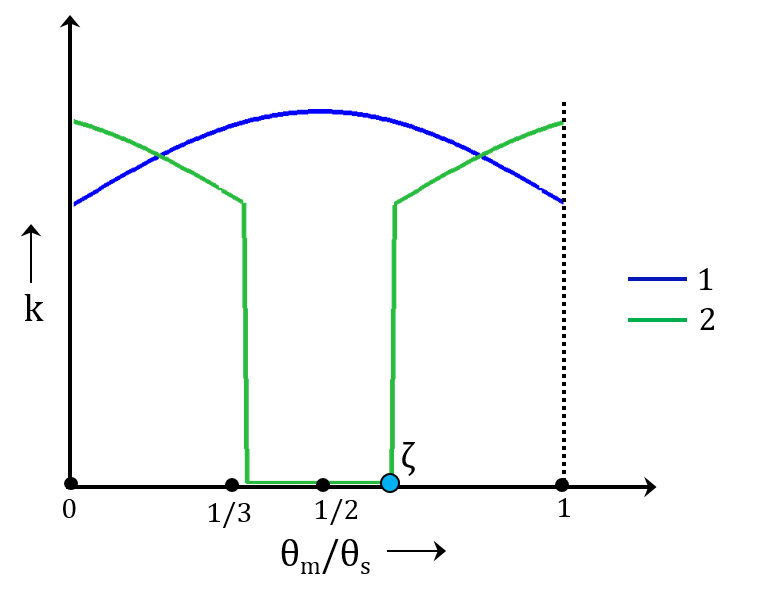
The typical variation of the gear tooth stiffness for the first and second pair of teeth when the contact ratio is between 1 and 2.
Effects of Gear Mesh Stiffness on the Dynamics of Helical Gears
To demonstrate the effect of gear mesh stiffness on gear dynamics, let’s use a pair of helical gears as an example. We first perform a transient study to compare a rigid gear mesh, gear mesh with a constant stiffness, and a gear mesh with a varying stiffness. We then analyze the effects of different types of gear mesh on the angular velocity of the driven gear as well as on the contact force. More details about this tutorial model can be found in the Application Gallery.
The figure below shows the variation of the driven gear’s angular velocity for the constant angular velocity of the driver gear. For a rigid gear mesh, the driven gear rotates at a constant speed. When the gear mesh stiffness is constant, the driven gear initially fluctuates before settling down to a constant speed. The gear mesh that has a varying stiffness continues to fluctuate about the mean value, giving rise to the vibrations.
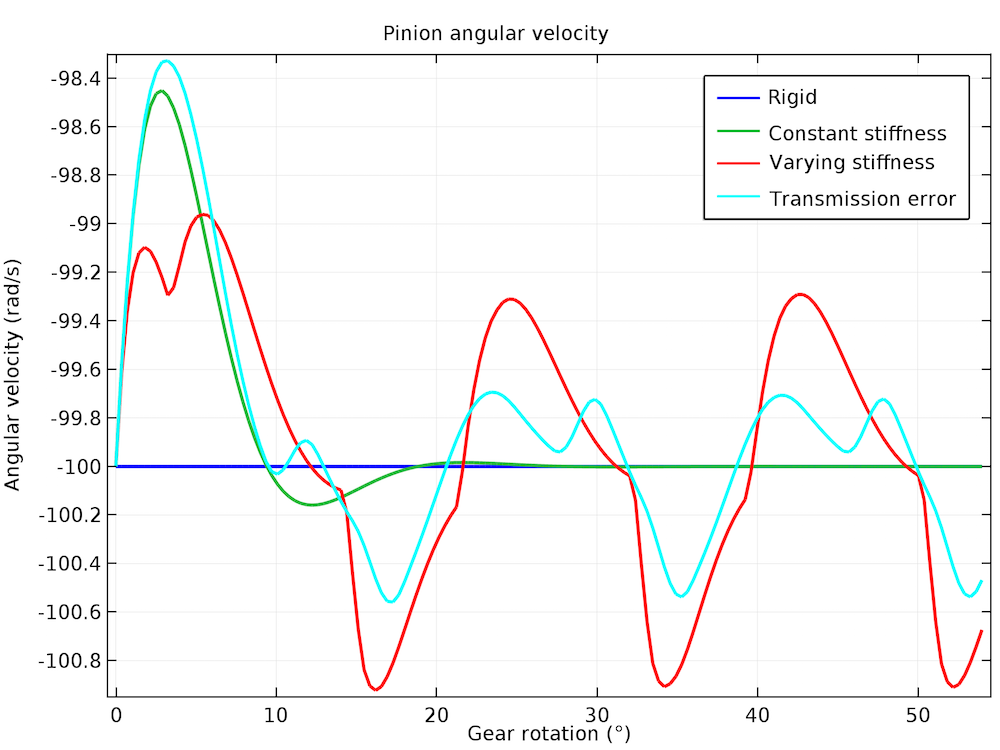
Driven gear angular velocity for different types of gear meshes.
We can observe a similar trend in the contact forces. The rigid and constant-stiffness gear mesh eventually begin to maintain a constant contact force, but the varying-stiffness gear mesh causes the contact force to fluctuate about the mean value. The contact force variation is periodic with respect to the mesh cycle, and the contact force varies from about 150 N to 450 N, with a mean value of 250 N. This large variation in the contact force within a mesh cycle rotation causes vibrations in other parts of the system. This may lead to noise radiation in the surrounding area.
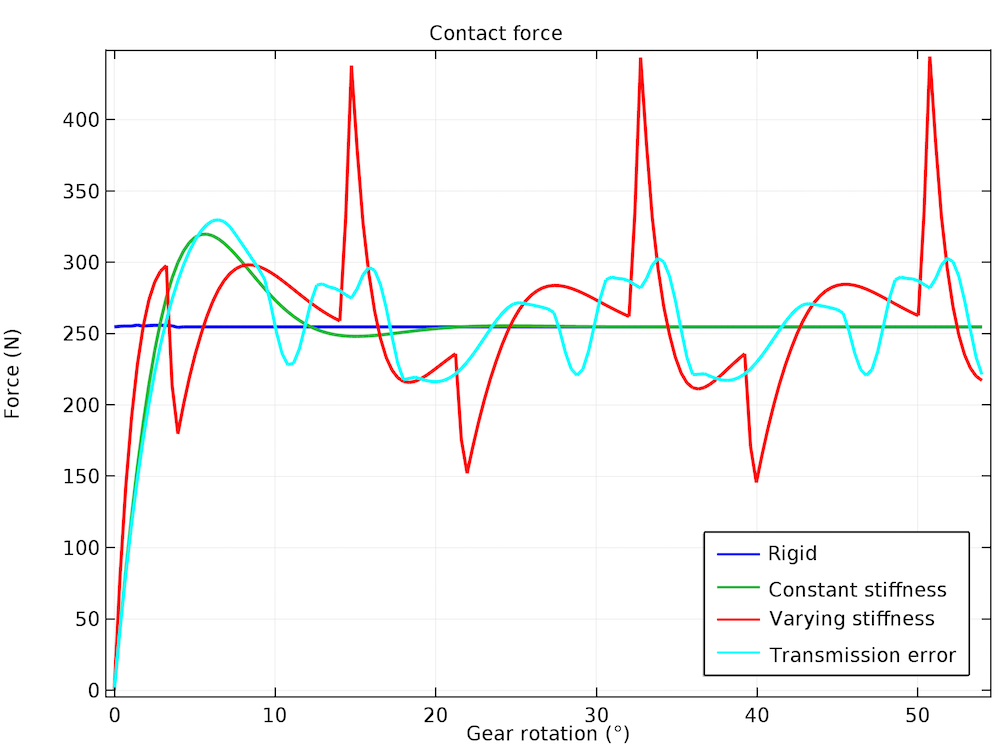
Variation of the contact force with gear rotation for different types of gear meshes.
Concluding Thoughts About Gear Mesh Stiffness
The variation of gear mesh stiffness, which depends on several geometric and material parameters, plays an important role in the NVH analysis of a transmission system. With COMSOL Multiphysics and the Multibody Dynamics Module, we can calculate its variation by combining a contact analysis with the parameterized gears in the Parts Library. We can then use the computed gear mesh stiffness in the multibody dynamics model to accurately capture the dynamics of gears working together with the other parts of the transmission system.
Stay tuned for the next blog post in our Gear Modeling series, where we’ll show you how to simulate gearbox noise and vibrations generated due to varying gear mesh stiffness. In the meantime, we encourage you to browse the additional resources below.
Learn More About Gear and Multibody Dynamics Modeling
- Read other blog posts related to multibody dynamics modeling on the COMSOL Blog
- Get started with simulating gears by downloading these tutorials:


Comments (5)
Khang Nguyen
March 9, 2018Dear Pawan Soami!
I am interested in this topic.
And I have seen your tutorial in Vibrations in a Compound Gear Train.
I am confuse two things, Would your like the explain me please?
1. The equation the relation between the torsion stiffness and the stiffness along the action line from where you cited? (kg=4kf/(dpw*cos(alpha)^2)
2. In the Contact boundary, you used the penalty method. Tell me: what is characteristic tiffness:
mbd.Eequ/100. Why do you divide the Eequ for the number “100”.
Thanks
Best regards
If could, please send your respond to my email: nquanmd@gmail.com
Pawan Soami
March 14, 2018 COMSOL EmployeeDear Khang Nguyen,
The equation relating the torsional stiffness and the stiffness along the line of action can be derived by writing and comparing the energy expressions for both the cases.
* Energy for rotational motion: T*th = kt*th*th
* Energy for linear motion: F*u = kg*u*u
* The displacement (u) and rotation (th) can be related as: u = (dpw/2)*cos(alpha)*th
Now equating the two energy expressions and substituting the displacement in terms of rotation gives the relation between the torsional stiffness and the stiffness along the line of action as mentioned in the blog.
Regarding your second query, the characteristic stiffness is used to define the value of penalty factor. The value of penalty factor doesn’t really alter the energy of the system and the results of the system. By changing the penalty factor, we control the penetration between the two objects. In ideal situation, the penetration should be close to zero which can be achieved by setting a very high value of the penalty factor however this is not suitable from numerical reasons. Hence sometimes we reduce the penalty factor value to allow certain amount of penetration and hence making the problem numerically more stable. This is the reason that the default value of penalty factor (or characteristic stiffness) which is obtained from the material properties is reduced by two orders of magnitude.
Please feel free to get back to me in case of more details.
Thanks!
Best regards,
Pawn Soami
Siddharth Ramakrishnan
January 8, 2019Hello Pawn,
In this example, the twist angle is defined as input . Is it possible to define the input speed/output resisting torque to generate von mises stresses in the tooth contact?
Thanks
Siddharth
Pawan Soami
January 9, 2019 COMSOL EmployeeDear Siddharth,
Yes, you can optionally define the output resisting torque to compute von Mises stresses in the gear teeth contact.
Please feel free to get back to me in case of more details.
Thanks!
Best regards,
Pawan Soami
Raghunath Thiagarajan
October 19, 2021Dear Pawan Soami
I am currently working on a gear problem where the two gear assembly has to be kept inside the air domain. To make the gear rotate I have to form an assembly in the geometry section and to put the model in an air domain and to make the airflow over the geometry surface I have to form a Union in the geometry section. I don’t know how to make both happen simultaneously. I have been trying to solve this problem for over a few months, but have not been able to find a solution. I need your help with this issue. Please help me out. Thanks in advance.
With Regards,
Raghunath T