
There are two aspects of home brewing: the culinary side and the engineering one. Many beer lovers start brewing either to improve a recipe, try to clone their favorite beer, or even simply just to see how it works. After brewing a few batches, however, it turns out that the brewing process can also be very challenging from an engineering point of view.
It’s Beer O’Clock
As I’m writing this, it’s Friday and we’ve had a long and very productive week. Like me, you’re probably wondering what type of IPA you will order with your nachos later. We are quite lucky to have such a wide selection of beers available in the U.S., thanks to the recent rise of craft beers. But rather than going to our local micro brewery, we could take it a step further and attempt to make our own beer.
Here, we give you a crash course on beer brewing and explain how you can improve the brewing process with CFD simulations. The main purpose is to find out how to cool down five gallons of boiling water as quickly as possible. But, first: Some context.
How to Brew Beer: 101
Making your own beer is relatively straightforward. If you can make tea, you can probably make beer.
Here’s my list of seven steps to brewing beer:
- The process starts by steeping cracked malted barley in hot water around 150°F-160°F for an hour. For home brewers, this is typically done in a cooler, so that the mixture remains at a constant temperature. Steeping the barley cracks down the starch into sugars to make it easier for the yeast to consume it during the fermentation phase.
- After an hour, the resulting liquid, the wort, is moved to a kettle where it is boiled for an hour (or up to two hours for some hoppier IPAs). Hops is added during the boiling process. Additions made early in the boiling process contribute to the bitterness of the beer, while hops added later contribute to the hoppy flavor that most of us love. For the hoppiest beers, even more hops is added right after the boiling step or a few days into the fermentation process. Hops is also used as a preservative agent.
- Next, we will cool down the wort as quickly as possible, before adding the yeast to begin the fermentation process.
- Now, we need to be patient for a few days and let the yeast work its magic.
- After the allotted time, we add some sugar to the result, bottle the beer, and give it a name. Let’s call it hopsol 1.0 for now.
- Another boring step… We need to wait a few weeks while the added sugar carbonates the bottles.
- Finally: We can taste our product, brag about it, and repeat the process.
That’s the standard procedure. But, why settle for standard when we can improve the process? Most of the above steps can be optimized with simulations. Let’s start with the most crucial one — Step 3: Cooling the wort.
How Can You Cool Down 5 Gallons of Wort as Quickly as Possible?
In Step 3, the boiling wort needs to be cooled down very quickly for several reasons.
First of all, it needs to be cool enough for the yeast to survive. Second, cooling it limits the production of sulfur compounds and other contaminants during the cooling process. These compounds are associated with off-flavors in the finished beer. Finally, some proteins need to be thermally shocked in order for them to precipitate.
We won’t go into these reasons in detail, as we prefer to focus on the engineering aspect of the process. The size of a typical home brew batch is between five and ten gallons. The problem of cooling down the liquid quickly becomes even harder in an industrial set-up, where the amount of wort to be cooled down is massive.
Some Ideas on How to Proceed
1. Adding Ice to the Kettle
I’ve seen on YouTube that you might try throwing ice in the boiling kettle. I would not recommend this as it might introduce contaminants in the beer and will dilute it.
2. Placing the Kettle in an Ice Bath
How about placing the boiling kettle in an ice bath in our kitchen sink? While this is the cheapest way, it is not the most efficient. I will let you find that out on your own using our Conjugate Heat Transfer interface (included in the CFD Module and the Heat Transfer Module.)
The cooling of the kettle in an ice bath can modeled very similarly to the Free Convection in a Water Glass model tutorial, found in our Model Gallery.
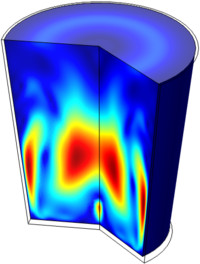
Free convection in a glass of water.
This model treats the free convection and heat transfer of a glass of cold water heated to room temperature. Initially, the glass and the water are at 5°C and are then put on a table in a room that’s 25°C warm. The boiling kettle cooling problem could be modeled the same way by setting the initial wort temperature to 100°C and the external wall temperature to 0°C.
3. Use a Wort Chiller
Alternatively, we could use a wort chiller. Basic wort chillers consist of a long helicoidal pipe that you immerse in the kettle at the end of the boiling process. You will then run cold water from your sink into the pipe to cool down the wort.
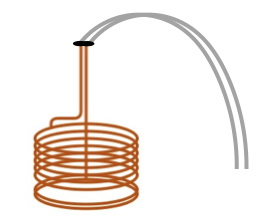
Sketch of a wort chiller.
As you can deduce by the shape, the modeling procedure for this wort chiller is identical to the one found in our geothermal heating problem model of a pond loop:
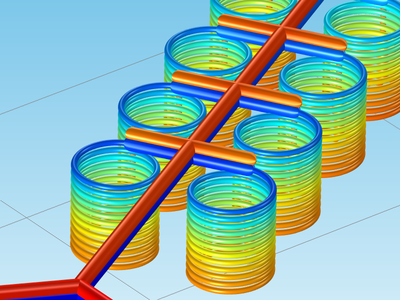
In this example, a pond is used as a thermal reservoir and fluid circulates underwater through polyethylene piping in a closed system. The model finds out how much heat is transferred from the pond to the working fluid in the pipes. To this end, the Non-Isothermal Pipe Flow interface sets up and solves the equations for the temperature and fluid flow in the pipe system.
In the pipe flow physics interface, the pipes are represented by 1D lines, rather than actual 3D pipes, which drastically reduces the computational load of such a model. The following snapshot shows a possible design for the wort chiller, immersed in the boiling kettle, and the corresponding temperature field within the pipes:
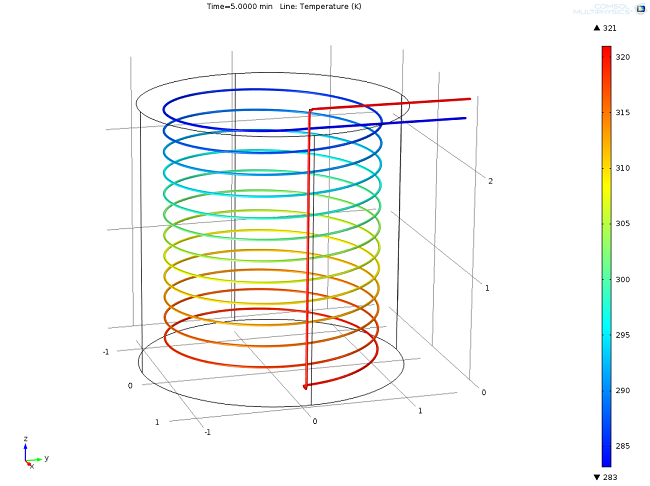
We could also combine method 2 and 3 for faster results, i.e., use a wort chiller while the kettle is in an ice bath.
4. Use a Plate Heat Exchanger
Another option is to use a flat plate or counterflow heat exchanger. A heat exchanger is a device that transfers heat from one fluid to another. Water, initially at a low temperature and used as the coolant, is being heated up while the wort is being cooled down. The following picture shows a flat plate heat exchanger.

Flat plate heat exchanger used to cool down beer at a local “brew-your-own-beer” establishment.
These types of heat exchangers are very popular due to their compact size. Many brewers also use counterflow heat exchangers.
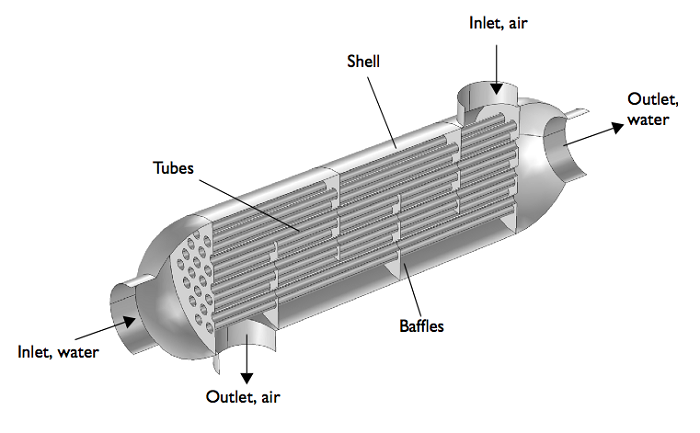
You can model these devices by following the step-by-step instructions in the Shell-and-Tube Heat Exchanger model, which shows the basic principles of setting up a heat exchanger model. In the model, two separated fluids at different temperatures flow through the heat exchanger, one through the tubes (tube side) and the other through the shell around the tubes (shell side).
Using a heat exchanger is not only the fastest way to cool down your wort, it is also the most efficient. Indeed, most of the heat taken form the wort is transferred to the water. This water can then be reused to steep the next batch of malted barley. This way, no energy is wasted!
Your Turn to Improve Your Beer Brewing Process with Simulations
Here, we have discussed conjugate heat transfer problems, a pipe flow model, and a heat exchanger model. I encourage you to try modeling these different cooling strategies in COMSOL Multiphysics and find out what works best. You can set up and solve these models using the CFD Module, Heat Transfer Module, and Pipe Flow Module.
After all this modeling, your beer must be pretty tasty and your friends are probably asking for more. It’s time to scale up and use a larger mixer tank, so that you don’t need to stir it manually anymore. Mixing tanks can be modeled using the Mixer Module, an add-on to the CFD Module that allows you to analyze fluid mixers and stirred reactors.
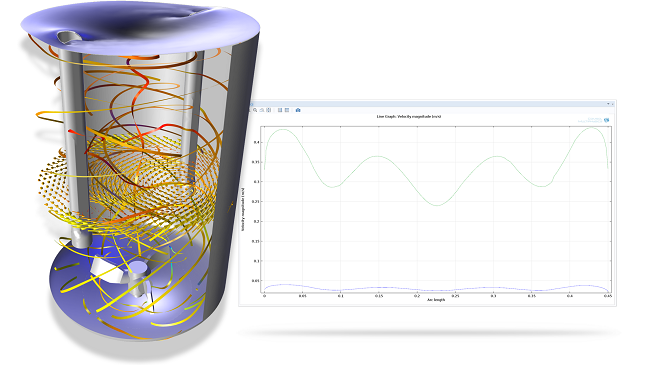
Model of a turbulent mixer with a three-bladed impeller. The model also considers the shape of the free surface.
If you have any questions about the models that I’ve presented here, contact our Technical Support team. If you are not yet a COMSOL Multiphysics user and would like to learn more about our software, please contact us via this form — we’d love to connect with you.


Comments (1)
Jeff Rehrig
March 23, 2025I was attempted to simulated steam condensing in a heat exchanger and was not believing the results. I think it has something to do with water droplets moving through the mesh- or trying to move the mesh to match the droplets. I had a beer while I was reflecting on how to complete my project. Since it was just a project for a thermodynamics class, I switched from condensing steam to cooling wort as quickly as possible. I enjoyed reading this blog. I agree and am willing to barter simulation for a beer or two……..