
It has been a remarkably warm winter in Boston, but we finally got our first snowfall. As I was staring out the window earlier, I started thinking about snowflakes and how their formation cannot be easily described mathematically. However, there is one special kind of snowflake that can be simply described, known as the Koch snowflake. Today, we will look at how this shape can be built with the Application Builder in COMSOL Multiphysics.
Creating the Koch Snowflake
As we have already mentioned on the blog, fractals have some interesting engineering applications. The Koch snowflake is a fractal that is notable due to its very simple iterative construction process:
- Start with an equilateral triangle, which is actually the zeroth iteration of a Koch snowflake.
- Find the centerpoint of every edge of the current snowflake.
- At the centerpoint of every edge, add a protruding equilateral triangle that is 1/3 the side length of the length of the current edge.
- Define the next iteration of the Koch snowflake to be the outside perimeter of the previous snowflake and all of the added triangles.
- Repeat steps 2-4 for as many iterations as desired.
This procedure is illustrated in the figure below for the first four iterations of the snowflake.
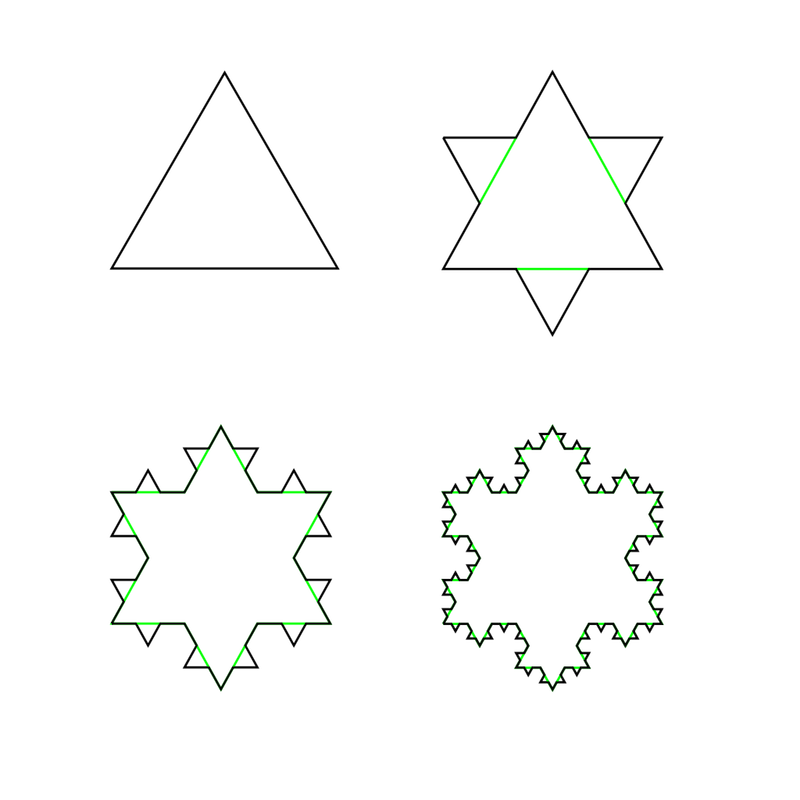
The first four iterations of a Koch snowflake. Image by Wxs — Own work. Licensed under CC BY-SA 3.0, via Wikimedia Commons.
Building the Geometry of a Koch Snowflake
Now that we know what algorithm to use, let’s look at how to create such a structure with the Application Builder and COMSOL Multiphysics. We begin with a new file and create a 2D geometry part within the Global Definitions node. This part takes five inputs: the side length of an equilateral triangle; the x– and y-locations of the midpoint of the base; and the components of the normal vector, pointing from the midpoint of the base to the far vertex, as shown in the images below.
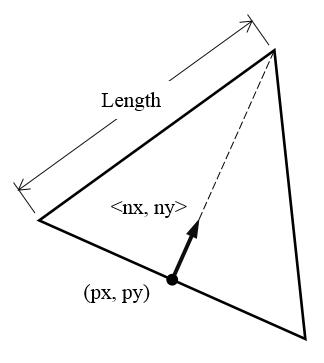
The five parameters that are used to control the size, position, and orientation of an equilateral triangle.
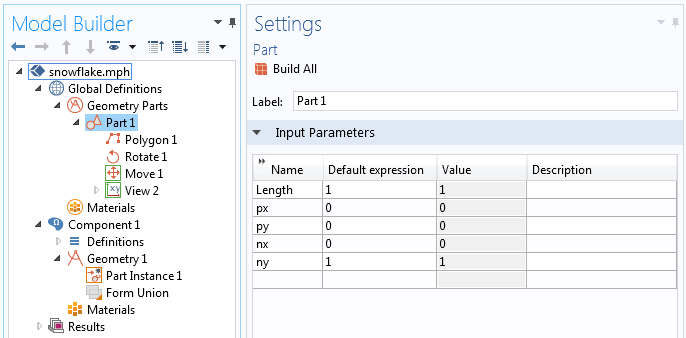
The input parameters for the geometry part are defined.
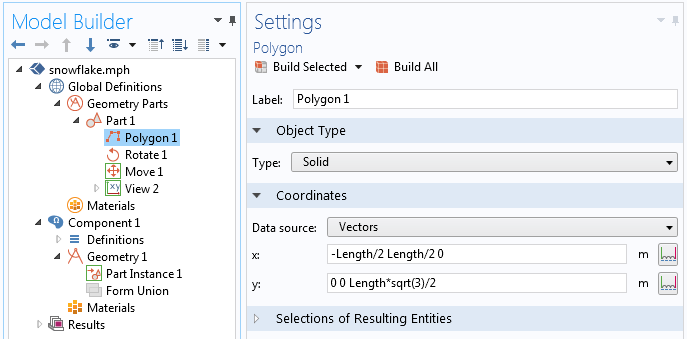
A polygon primitive is used to define an equilateral triangle.
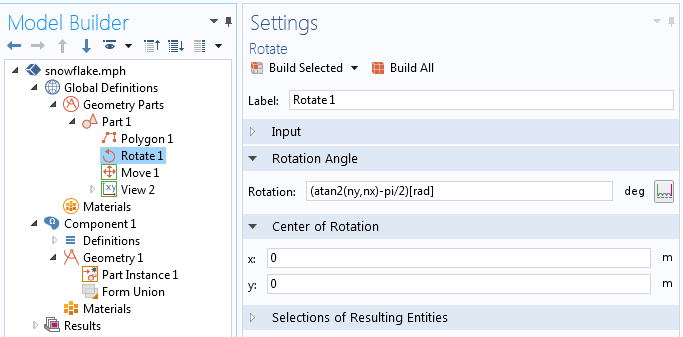
The part is rotated about the center of the bottom edge.
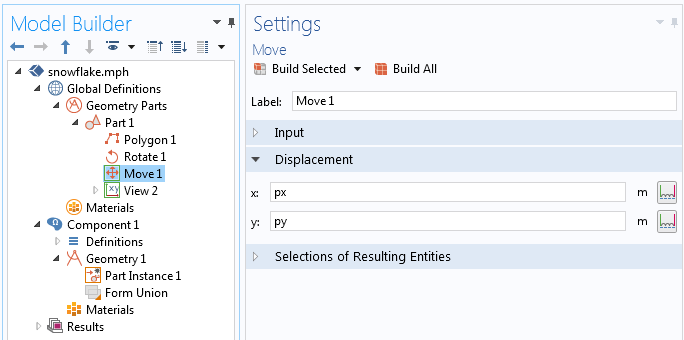
The part is moved from the origin.
Now that we defined the geometry part, we can call a single instance of the part within the Geometry branch. This single triangle is equivalent to the zeroth iteration of the Koch snowflake, and we are now ready to use the Application Builder to create more complex snowflakes.
Laying Out the App’s User Interface with the Application Builder
The app has a very simple user interface. It has only two features with which the user can interact: a Slider (labeled 1 in the image below) that specifies the number of iterations to take to produce the snowflake, and a Button (label 2) to select, which creates and displays the resultant geometry. There is also a Text Label (label 3) and a Data Display (label 4) that show the number of iterations that are taken, as well as a Graphics window (label 5) in which the resultant geometry is plotted.
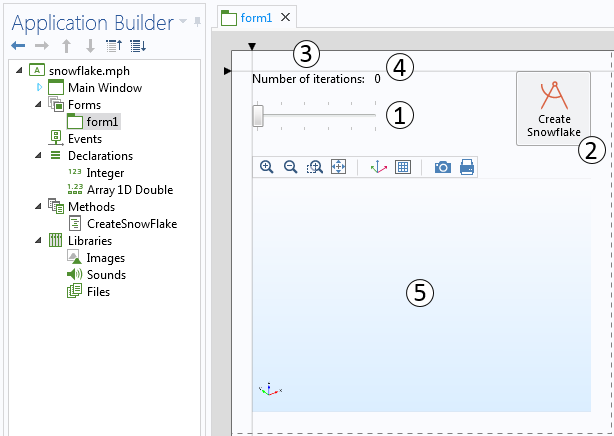
The app has a single form with five features.
There are two Declarations within the app that define an integer value, named Iterations, which is zero by default but changed by the user. There is also a 1D array of double-precision numbers, named Center. A single element in the array has a value of 0.5, which is used to find the centerpoint of each edge. This value is never changed.
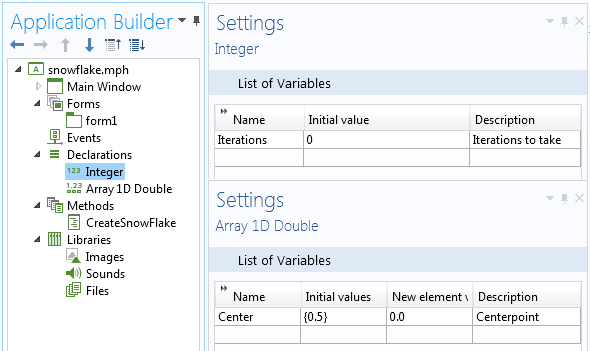
The settings for the two declarations.
The slider feature within the user interface controls the value of the integer, Iterations. The screenshot below shows the slider’s settings and the values, which are specified to be integers between 0 and 5. This source is similarly selected for the Data Display feature to display the number of iterations to take. We limit the user to five iterations, as we use an algorithm that is not very efficient but is quite simple to implement.
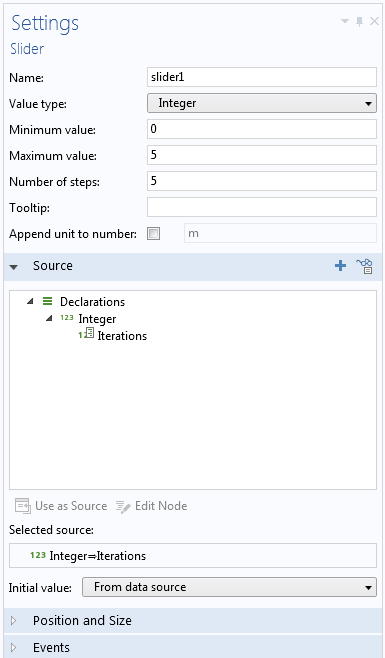
The settings for the slider feature.
Next, we can look at the settings for our button, as shown in the screenshot below. There are two commands that are run when the button is pressed. First, the method CreateSnowFlake is called. Second, the resultant geometry is plotted in the graphics window.
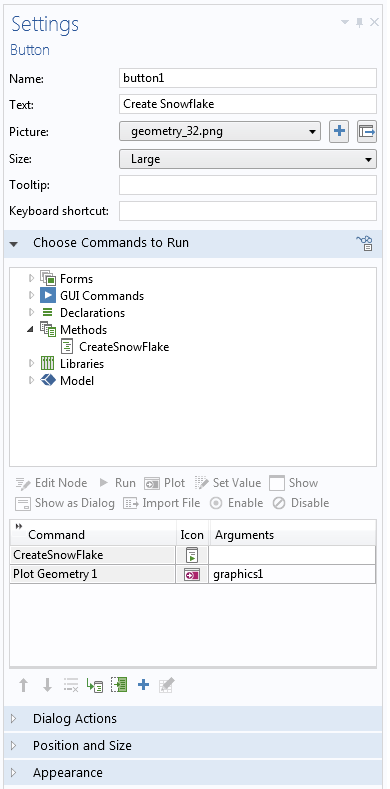
The button settings.
We have now looked over the user interface of our app and can see that all of the geometry creation for the snowflake must happen within the method. Let’s take a look at the code of this method, with line numbers added on the left and text strings highlighted in red:
1  model.geom("geom1").feature().clear();
2  model.geom("geom1").create("pi1", "PartInstance");
3  model.geom("geom1").run("fin");
4  for (int iter = 1; iter <= Iterations; iter++) {
5    String[] UnionList = new String[model.geom("geom1").getNEdges()+1];
6    UnionList[0] = "pi" + iter;
7    for (int edge = 1; edge <= model.geom("geom1").getNEdges(); edge++) {
8      String newPartInstance = "pi" + iter + edge;
9      model.geom("geom1").create(newPartInstance, "PartInstance").set("part", "part1");
10     with(model.geom("geom1").feature(newPartInstance));
11       setEntry("inputexpr", "Length", toString(Math.pow(1.0/3.0, iter)));
12       setEntry("inputexpr", "px", model.geom("geom1").edgeX(edge, Center)[0][0]);
13       setEntry("inputexpr", "py", model.geom("geom1").edgeX(edge, Center)[0][1]);
14       setEntry("inputexpr", "nx", model.geom("geom1").edgeNormal(edge, Center)[0][0]);
15       setEntry("inputexpr", "ny", model.geom("geom1").edgeNormal(edge, Center)[0][1]);
16     endwith();
17     UnionList[edge] = newPartInstance;
18   }
19   model.geom("geom1").create("pi"+(iter+1), "Union").selection("input").set(UnionList);
20   model.geom("geom1").feature("pi"+(iter+1)).set("intbnd", "off");
21   model.geom("geom1").run("fin");
22 }
Let’s go over what each line of code does:
- Clears out all of the existing geometry sequence so that we can start from scratch.
- Creates a single part instance of a triangle, using the default size, orientation, and location. This is our zeroth-order snowflake and has the tag identifier
pi1. - Finalizes the geometry. This is needed to reinitialize all geometry indices.
- Starts iterating over all specified snowflake iterations, using the declaration of
Iterationsas the stop condition. - Defines an empty array of strings,
UnionList. Each element of the array contains the tag identifier of a different geometry object. The length of this array equals the number of edges in the last iteration, plus one. - Defines the first element in the
UnionListarray. This is the tag identifier of the result of the previous iteration. Keep in mind that the zeroth iteration is already created on lines 1-3. The integer value ofiteris automatically converted to a string and appended to the string"pi". - Iterates over the number of edges in the previously generated snowflake.
- Specifies the tag identifier for the new triangle part instance that is created on this edge. Note that the integer values of
iterandedgeare each sequentially appended to the stringpi, the part instance tag identifier. - Creates a part instance of the triangle and gives it the tag identifier that was just specified.
- Specifies that lines 11-15 refer to the current part instance using the
with()/endwith()statement. - Specifies the length of the side triangle. The zeroth order has a side length of one, so the nth iteration has a side length of (1/3)n. The
toString()function is needed to cast the floating point value into a string. - Specifies the x-position of the new triangle as the centerpoint of the side of the last iteration. The
edgeXmethod is documented in the COMSOL Programming Reference Manual. Recall thatCenteris set to be 0.5. - Specifies the y-position.
- Specifies the x-component of the normal vector of the triangle. The
edgeNormalmethod is documented in the COMSOL Programming Reference Manual. - Specifies the y-component of the normal vector.
- Closes the
with()/endwith()statement. - Adds the tag identifier of the current triangle to the list of all objects.
- Closes the iteration over all edges.
- Creates a Boolean Union of all objects in the geometry sequence. Specifies the tag to be
piN, whereNis the next iteration number. The parentheses are needed around(iter+1)such that the incremented value ofiteris converted to a string. - Specifies that the interior boundaries of the final object aren’t kept.
- Finalizes the geometry. This reinitializes all geometry indices for the next snowflake iteration.
- Closes the snowflake creation iteration loop.
And with that, we have covered everything that goes into our app. Let’s look at some results!
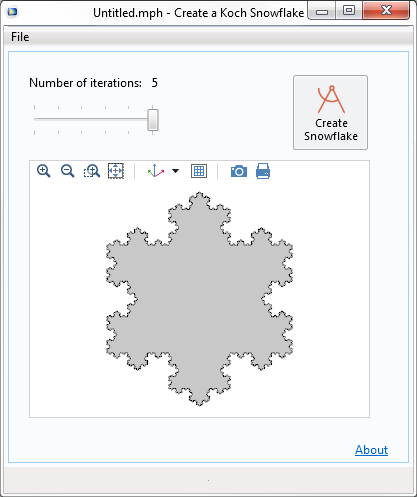
Our simple Koch snowflake application.
We could expand our app to write out the geometry to a file, or even to perform additional analyses directly. For example, we could design a fractal antenna. If you’re interested in antenna design, take a look at our example of a Sierpinski fractal antenna, or even make one from scratch.
Try It Yourself
If you want to build this app yourself and you haven’t started using the Application Builder yet, you will find the following resources helpful:
- Download the Introduction to Application Builder manual
- Watch these videos to learn about how to use the Application Builder and COMSOL Server™
- Read these blog posts to see how simulation apps are used in a variety of applications
Once you’ve gone through that material, you’ll see how this app can be extended to change the snowflake size, export the created geometry, evaluate the area and perimeter, and much more.
What kind of app would you like to create with COMSOL Multiphysics? Contact us for help.


Comments (2)
Matúš Vaňko
February 13, 2016Amazing! Despite my near to zero experience with Comsol I managed to create this application a it’s actually working flawlessly. Thank you for this neat tutorial/article. I have one question though. Is there a way to speed up computation of iterations by using some sort of shortcut in the method? Or is this time complexity bounded to Comsol environement/level of abstraction?
Walter Frei
February 16, 2016 COMSOL EmployeeDear Matúš,
Thank you very much for the feedback, it is appreciated.
Regarding the speedup: At each iteration the number of sides increases by a factor of four, so if your are computing the entire snowflake then the algorithm time exponentially increases. The algorithm here admittedly sacrifices performance for readability and terseness. We introduce a lot of overhead by creating intermediate Part Instances and we throw away the existing snowflake iteration before creating a new one. It is, as they say in the textbooks, left as an exercise to the reader to come up with a faster algorithm. You could, for example, use a single “Polygon” feature to create the entire perimeter of the snowflake in one operation for each iteration. This would require more coding and less usage of the built-in COMSOL geometry features.