
The effect of quantum tunneling can be important if the thickness of the energy barrier for the charge carrier is comparable to or smaller than the evanescent decay length. In order to account for this effect, we can use the WKB Tunneling Model feature, available in the Semiconductor Module as of version 5.4 of the COMSOL® software, for the heterojunction and Schottky contact boundary conditions. Here, we demonstrate their usage using a benchmark model.
The Wentzel–Kramers–Brillouin Approximation
Under the assumption of the Wentzel–Kramers–Brillouin (WKB) approximation, the tunneling current adds a fractional increase, \delta, to the thermionic current, according to the reference paper by K. Yang, J.R. East, and G.I. Haddad (Ref. 1). For a potential barrier spanning from point 1 to point 2 along an electric field line, the fractional factor \delta is given by
(1)
where q is the elementary charge, k_B is the Boltzmann constant, T is the absolute temperature, h is the Plank constant, m is the effective mass, and E_b is the conduction band edge (E_c) for electrons and the negative of the valance band edge (-E_v) for holes.
The inner integral (\int_1^2~dl) is carried out from point 1 to point 2 along the electric field line, while the outer integral is carried out along the energy axis. The upper limit of the outer integral is given by V_{max} = \textrm{max}(Eb)/q (max of E_b within the potential barrier) and the lower limit is given by V_{min}=\textrm{max}(E_{b,1},E_{b,2})/q, where E_{b,1} and E_{b,2} are taken immediately outside of the base of the potential barrier. Note that it should be the max, not the min, of the two base values.
The WKB Tunneling Model Feature
To model the tunneling effect using the WKB approximation, first set up the boundary condition where the extra current density from tunneling is to be added. For heterojunctions, select the Thermionic emission option; for metal contacts, select Ideal Schottky. Once these (nondefault) options are selected, a new section called Extra Current Contribution appears, which is where we can specify extra current contributions for electrons and holes separately. By default, no extra current is added. We can also choose either the built-in WKB tunneling model or the user-defined option. See an example screenshot below.
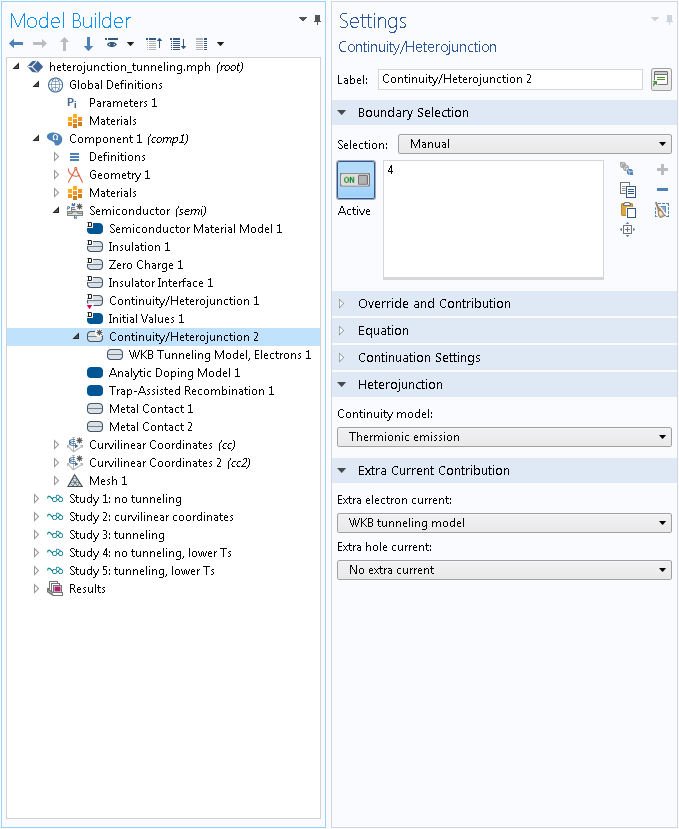
Selecting the Thermionic emission option to add extra current contribution.
As shown in the previous section, the variables related to the potential barrier are computed differently for electrons and holes. Therefore, we have introduced one distinct feature for each type of carrier. These features are added to the Model Builder as subnodes to the heterojunction or the Schottky contact boundary conditions. An example is shown in the screenshot below.
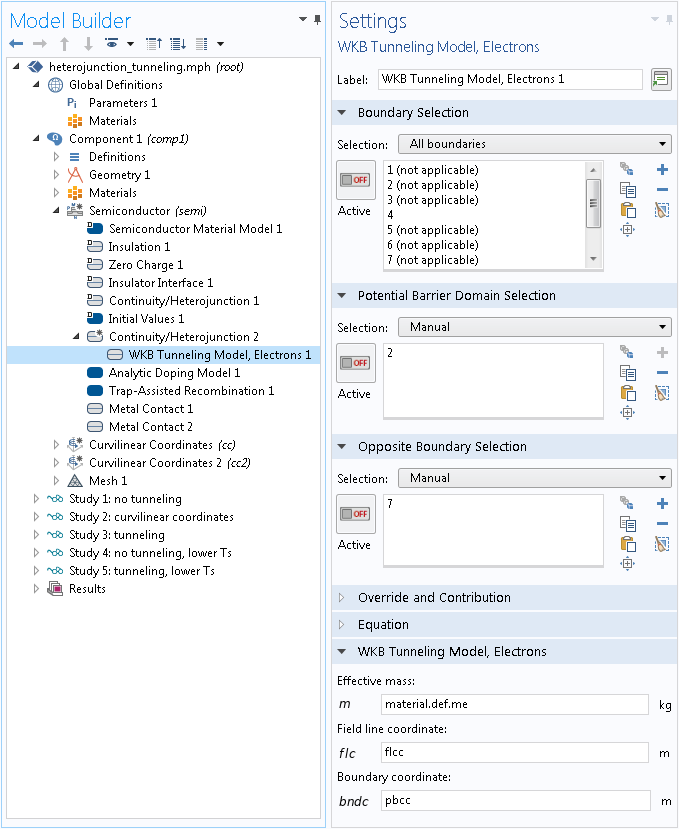
The Model Builder tree structure and the Settings window for the WKB Tunneling Model, Electrons feature.
In the Settings window shown above, the usual Boundary Selection specifies the boundary where the extra current density is added. Next, the domain selection specifies an adjacent domain where the potential barrier is located. Then, the second boundary selection specifies the boundary of the domain that is on the opposite side from the first boundary selection. In essence, the tunneling occurs across the selected domain, in between the first and the second boundary selections.
For 2D and 3D models, in addition to the effective mass, we need to enter a variable for the coordinate along the electric field line direction, and one (2D) or two (3D) variable(s) for the coordinate(s) spanning the tunneling boundary. In a simple rectangular geometry, the built-in spatial variables x, y, and z (or expressions based on them) can be used for the coordinate variables. In a more general geometry, the Curvilinear Coordinates mathematical interface comes in handy. The Heterojunction Tunneling tutorial model in the Application Gallery shows the latter approach.
The Graded Heterojunction Model
This heterojunction tunneling model compares the simulated current density of a graded heterojunction with and without tunneling at different temperatures. The device configuration and all material properties are taken from the reference paper (in particular, section 3.3) in order to compare the simulation results.
The device is a molecular-beam-epitaxy-grown AlxGa1-xAs-graded heterojunction that forms a triangular-shaped potential barrier for the electrons. To obtain the best fit to the experimental data, the authors of the paper have run each of their simulations with a selected set of material and device parameters that are not necessarily the same as the nominal experimental values. To compare the simulation results, we use the same set of simulation parameters selected by the authors, without any further justification other than the arguments already made in the paper.
The triangular barrier is formed by spatially varying the Al mole fraction of the AlxGa1-xAs layer. Using the COMSOL Multiphysics® software, it is straightforward to create a material with properties depending on local variables, such as the mole fraction, as well as on parameters and variables such as the reference temperature, lattice temperature, and doping concentrations. The mole fraction is in turn defined by a spatially varying variable. A variable can be made spatially varying by using explicit expressions or by using different definitions in different domains. We use both techniques in this model. As shown in the screenshot below, we use multiple Variables nodes under Definitions to make the variables for doping and mole fraction different in different domains. In addition, we use the built-in spatial coordinate variable x to make the mole fraction spatially dependent within Domain 2.
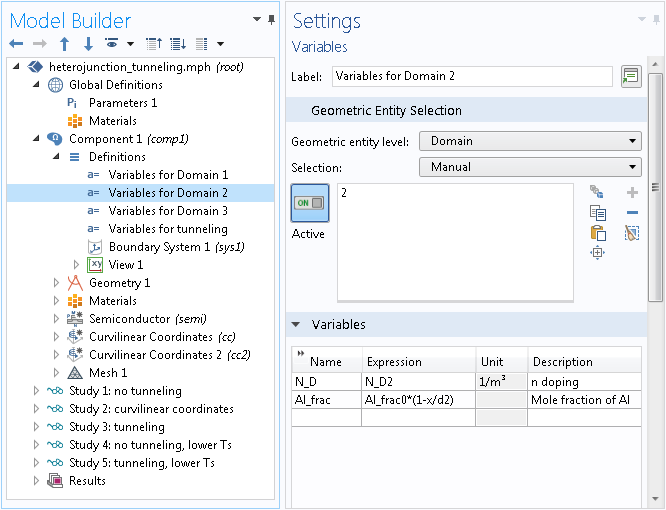
Variables for doping and mole fraction are made different in different domains using multiple nodes under Definitions, (one for each domain). The built-in variable x is used to make the variable Al_frac spatially dependent.
The spatially dependent variables defined above can be used in material and physics definitions, seen below.
The doping variable N_D is used directly in the doping feature, as shown in the screenshot below.
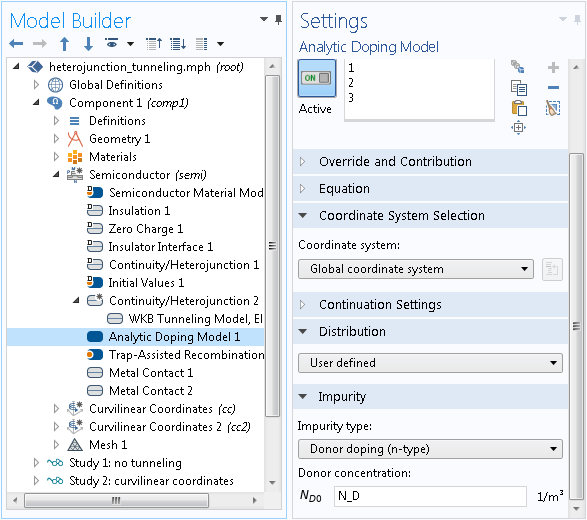
Using the spatially dependent variable N_D in the definition of doping concentrations.
The mole fraction variable Al_frac is used to define a convenient symbol x in the material definition, which is under the Local Properties section of the Settings window for the Basic subnode. The symbol x is in turn used to define the density of states (DOS) effective mass, the relative permittivity, the band gap, the electron affinity, and the mobility. Note that the prefix def is used to access the symbols defined under the Basic subnode, whose tag is def. For example, in the screenshot below, the expression def.x is used in the input fields for the effective masses me and mh.
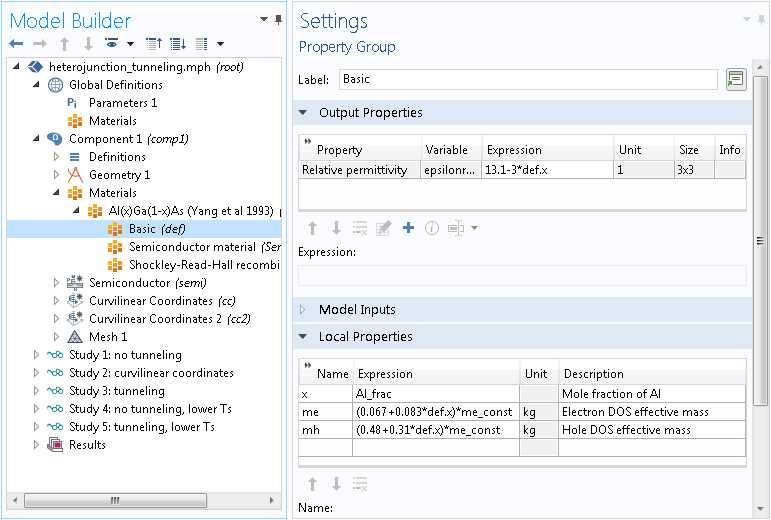
Using the spatially dependent variable Al_frac in material definitions via the symbol def.x.
When accessing the material properties in the physics settings, the prefix material can be used. For example, use the expression material.def.x for the symbol x, as shown in the screenshot below. Another example is shown in the earlier screenshot, which accesses the electron effective mass using the expression material.def.me.
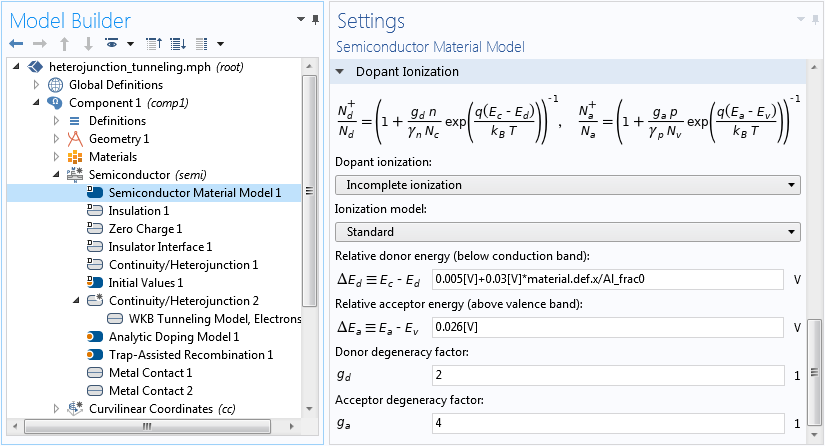
Using the prefix material to access material properties in physics settings.
Setting Up Curvilinear Coordinates
As mentioned earlier, we can use the Curvilinear Coordinates interface to create coordinates along the electric field lines and the tunneling boundary (in the case of a general geometry where simple expressions of the built-in variables x, y, and z are not feasible). In this model, the geometry is a simple rectangle (see Fig. 2b in Ref. 1) in which the electric field line and the tunneling boundary coordinates are simply x and y, respectively. Nevertheless, we still use the Curvilinear Coordinates interface in this model for demonstration purposes. Two Curvilinear Coordinates interfaces with the Diffusion Method option are created in the Model Builder, one for the electric field line and the other for the tunneling boundary, as shown in the screenshot below.
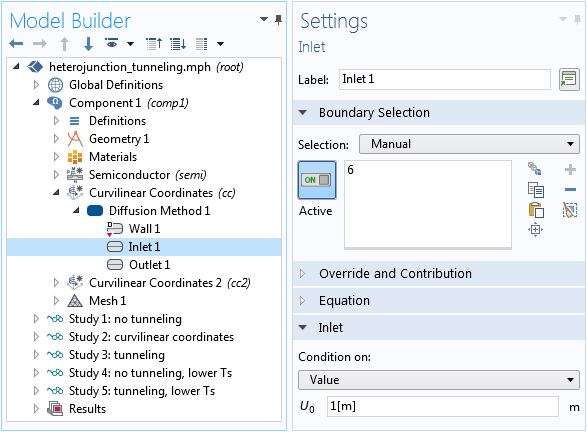
The Settings window for the Inlet boundary.
Place the Inlet and Outlet boundaries on the opposite side of the potential barrier domain in such a way that the solution varies along the desired coordinate. The solutions for the two Curvilinear Coordinates interfaces are shown in the figure below.
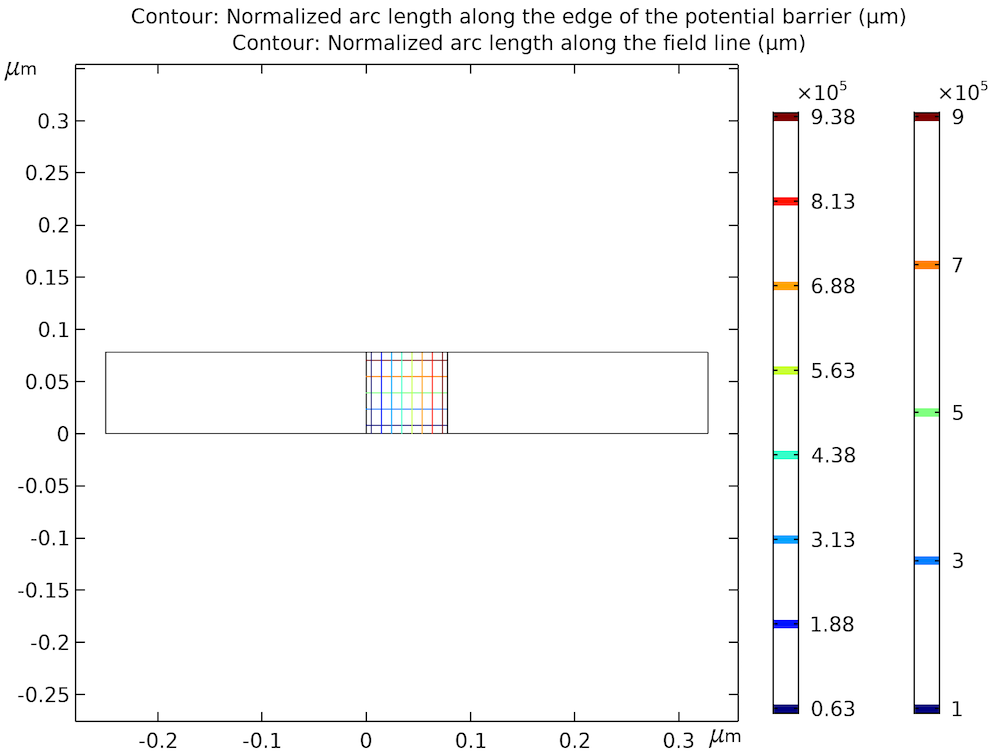
The solutions of two Curvilinear Coordinates interfaces. The vertical contours are the coordinates for the electric field line and the horizontal contours are the coordinates for the tunneling boundary.
In this example, domain 2 happens to cover the region of interest for the line integration across the potential barrier. In general, the region of interest can be defined by different boundaries drawn in the geometry, which may or may not coincide with the material boundaries.
For an arbitrary geometry, the solution to the Curvilinear Coordinates interface may not coincide exactly with the electric field line coordinate. However, it provides a good approximation and removes the burden of searching for the field lines numerically.
The solutions shown in the figure above are used to define the coordinate variables in the WKB tunneling feature. See the screenshot below for the variable definition and the earlier screenshot for the WKB tunneling feature settings.
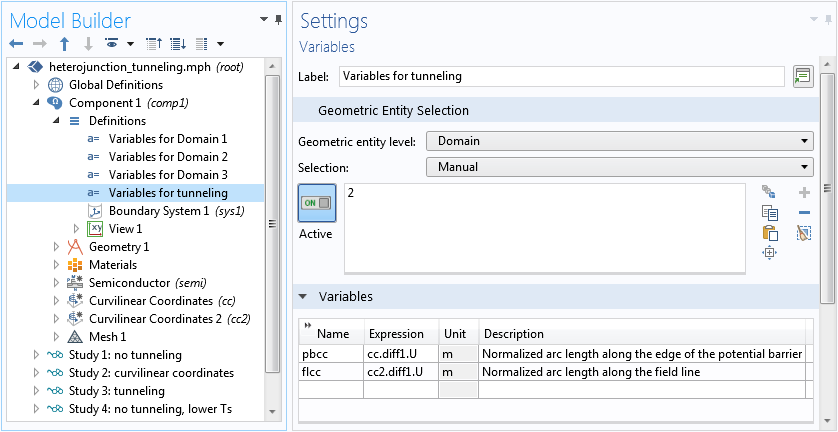
The Settings window showing the definition of the variables for tunneling.
Other Physics Settings for Simulating Tunneling
Since the tunneling effect is highly sensitive to the shape of the potential barrier, we switch to the finite element quasi-Fermi level formulation. The default finite volume formulation would require a much finer mesh, due the fact that the dependent variables are constant within each mesh element.
Two heterojunction boundary conditions are set up in the model tree to compute and compare the result with and without the tunneling effect.
Solving the Graded Heterojunction Model
The model is solved in stages. Study 1 computes the case of no tunneling. Study 2 solves the curvilinear coordinates only once, since they remain the same throughout the model.
Study 3 solves the case that includes the tunneling effect and only has the semiconductor physics selected. To provide a good initial condition, the Initial values of variables solved for settings are used to point to the solution from Study 1. Since the Curvilinear Coordinates interfaces are not included in the study step but are still required by the tunneling feature, they are configured using the Values of variables not solved for settings to point to the solution from Study 2. See the screenshot below for the relevant settings.
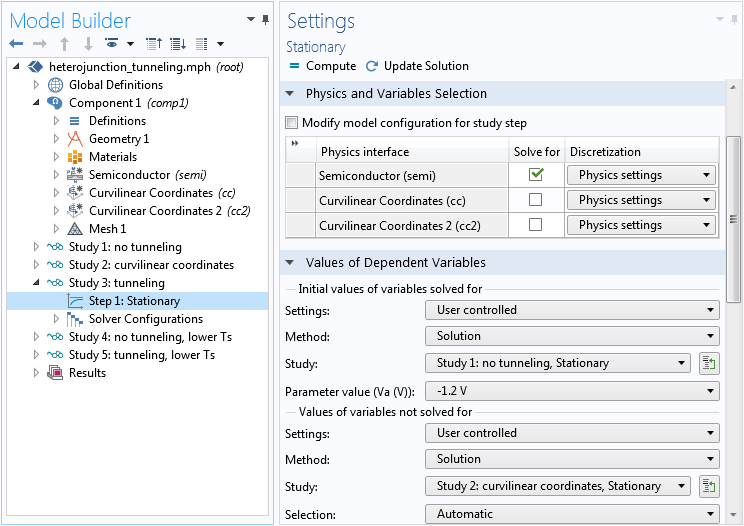
Study settings. Note the distinct use of the Initial values of variables solved for and Values of variables not solved for settings.
Two more studies are used to compute lower-temperature cases, with the similar use of the Initial values of variables solved for and Values of variables not solved for settings. The very nonlinear equation system often requires an Auxiliary sweep from a favorable initial condition. In the case of lower temperatures, we found that convergence is easier when starting the sweep from low to high voltage for the I-V curve.
Comparing the Simulation Results to a Reference
The figure below shows a comparison of the current-density-versus-voltage (J-V) curves at 300 K between the cases with and without tunneling. It agrees well with Fig. 12 in Ref. 1.
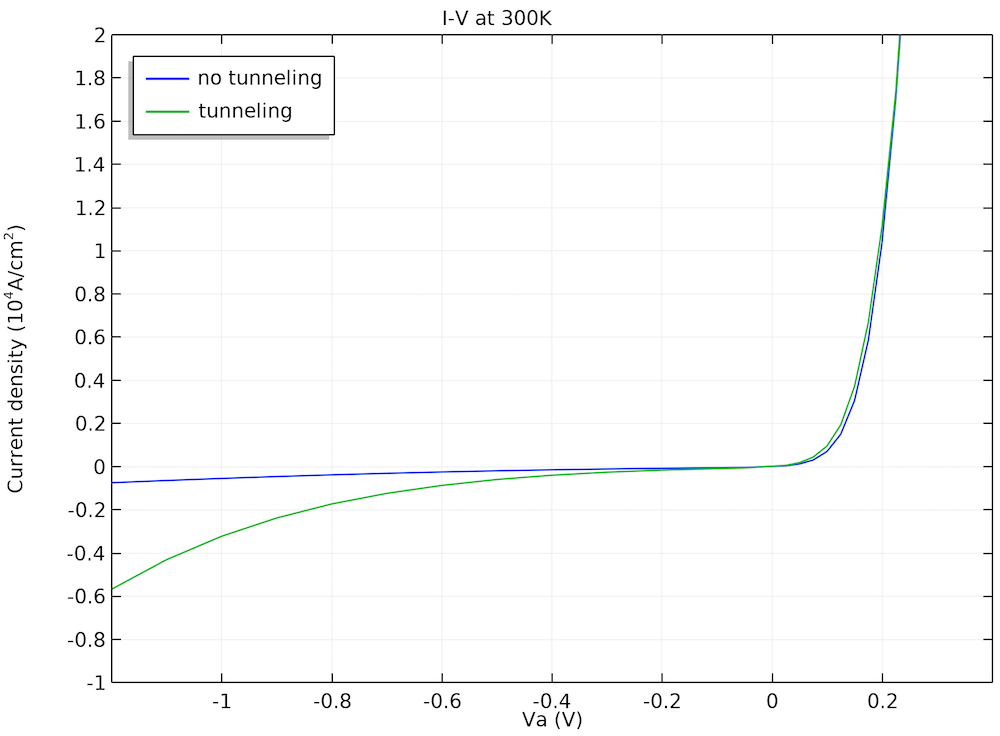
Comparison of the J-V curves obtained with and without tunneling.
To illustrate the role played by the barrier width on the magnitude of the tunneling current, the authors compared the conduction band diagram and the electron quasi-Fermi level at two bias voltages in Fig. 13 in the paper, which is well reproduced by our model, as shown below.
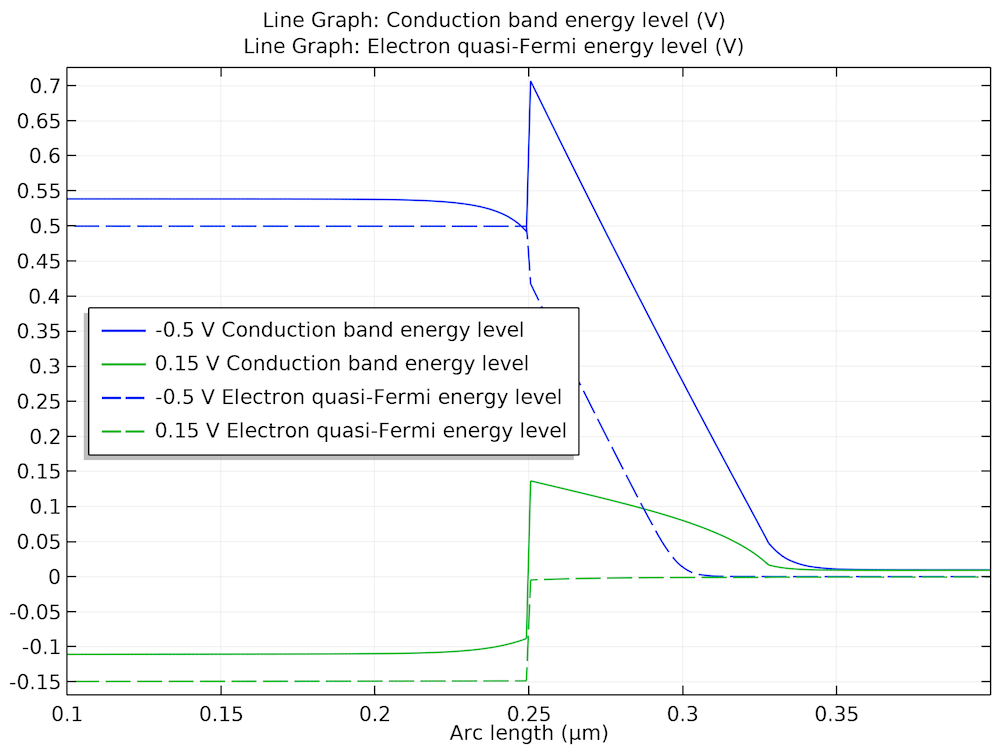
Band diagrams at two bias voltages illustrate the role played by the barrier width on the tunneling effect.
Finally, the figure below shows good agreement of the J-V curves at different temperatures with Fig. 14 in the paper.
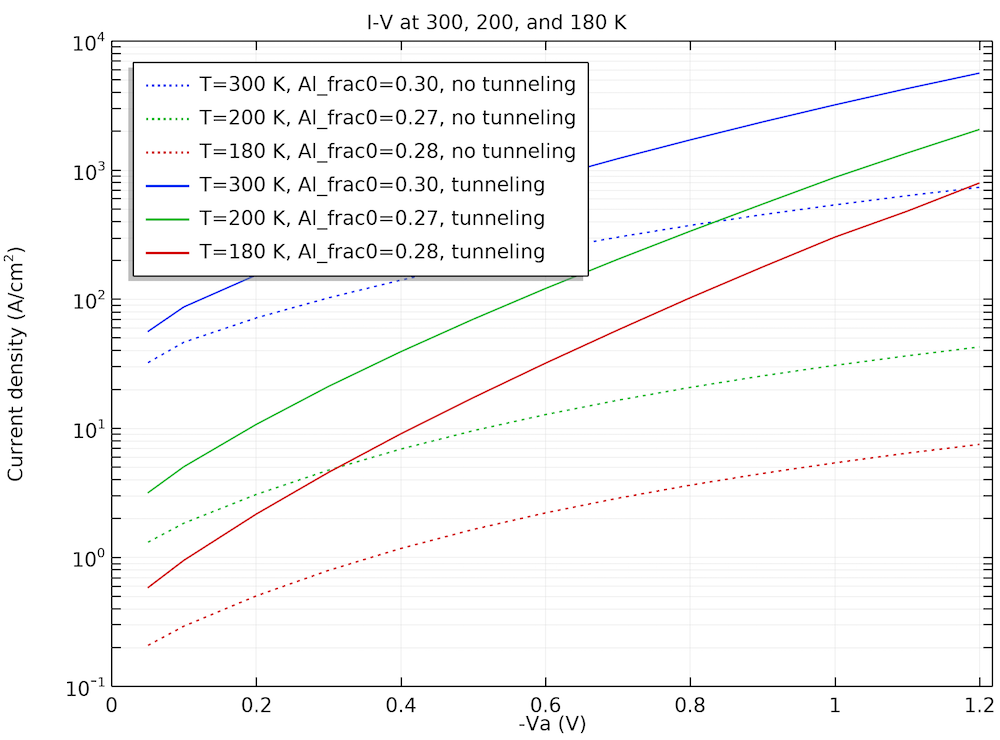
J-V curves at different temperatures.
Concluding Thoughts
In this blog post, we have demonstrated the WKB tunneling feature using a benchmark model of a graded heterojunction. We have also showed how to set up user-defined ternary material properties. The general technique of configuring the Initial values of variables solved for and Values of variables not solved for study settings has been discussed as well and can be applied in many modeling situations. We would love to hear how you use these features and techniques in your simulation work.
To try the Heterojunction Tunneling model, click the button below to go to the Application Gallery. By logging into your COMSOL Access account, you can download the documentation for this example and the MPH file.
Reference
-
- K. Yang, J.R. East, and G.I. Haddad, “Numerical Modeling of Abrupt Heterojunctions using a Thermionic-Field Emission Boundary Condition,”
Solid-State Electronics
- , vol. 36, no. 3, pp. 321–330, 1993.


Comments (3)
EFFAH JAMIL
May 3, 2020Hi. I am currently working with heterojunction tunneling device with 8 layers of domain, but currently encounter problems in order to produce I-V characteristics graph when I change the geometry to 8 layers. Can anyone guide me with my case?
EFFAH JAMIL
May 3, 2020These are some problems that I encounter.
1)- “Feature: Stationary Solver 1 (sol1/s1)
Failed to find a solution for all parameters,
even when using the minimum parameter step.
Maximum number of Newton iterations reached.
Returned solution is not converged.
Not all parameter steps returned.”
2) ” Value of Va not monotonous”
Brianne Christopher
May 5, 2020 COMSOL EmployeeHello Effah,
Thank you for your comment.
For questions related to your modeling, please contact our Support team.
Online Support Center: https://www.comsol.com/support
Email: support@comsol.com