
Levitating objects in midair may seem like something out of science fiction, but it’s actually a scientific reality. One way to levitate matter is by using sound waves to lift and suspend small samples via a physics phenomenon known as acoustic levitation. To see if the design of an acoustic levitator could be improved upon, Lothar Holitzner, development engineer at the Paul Scherrer Institute, created a practical model using a step-by-step multiphysics approach.
Floating Objects by Making Waves
Given enough intensity, sound waves are capable of lifting small objects (solids, liquids, and heavy gases) into the surrounding environment (air or liquid) as long as standing waves are generated. To produce standing waves in an acoustic levitator setup, two speakers are typically arranged so that one speaker, which serves as a reflector, is on top and the other speaker, which acts as a transducer, is on the bottom, with space in between them. The concave shape of the components helps focus the sound more intensely as it bounces off these surfaces. When the transducer and reflector are placed at the right distance away from each other (the speakers generate sound waves slightly above the audible range), the emitted and reflected sound waves interfere with each other, thus producing a standing wave.
Standing waves have nodes (where the pressure is at minimum) and antinodes (where the pressure is at maximum). The nodes are critical in acoustic levitation: It’s there that the pressure is such that it can essentially cancel out gravity and allow small objects to float.
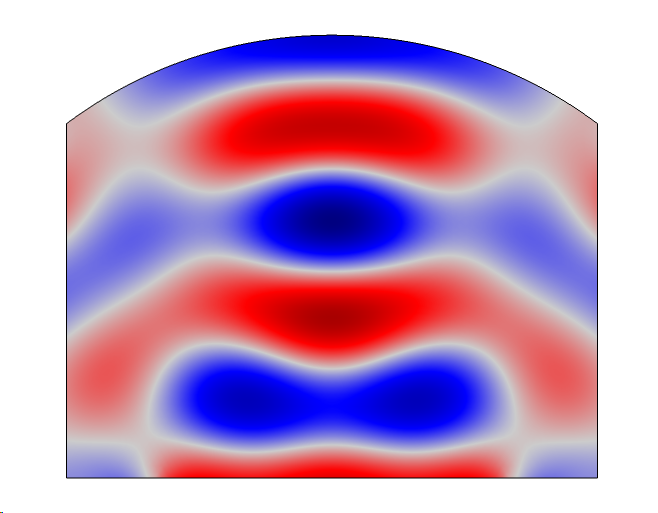
Example of a standing wave pattern in a simplified acoustic levitator setup.
Extraterrestrial and Terrestrial Uses of Acoustic Levitation
In the 1980s, NASA and the European Space Administration (ESA) used acoustic levitation to study droplet formation and motion in a microgravity environment, which provided more insight into, for example, the theories behind planet and star evolution. In space, this levitation can be performed in gas-filled enclosures within a spacecraft. Nowadays, on Earth, we’re able to create microgravity conditions that help engineers replicate experiments that previously could only be done on spacecraft. Microgravity conditions are particularly useful in acoustic levitation because there is much less acoustic radiation pressure needed to balance the pull of gravity.
One advantage of using this type of system terrestrially is the ability to perform certain techniques under containerless conditions. In containerless processing, acoustic levitation is used to manufacture microchips that are easier to harden and sharpen while suspended (rather than being handled) due to their small size. Some types of chemical processing also work better in containerless conditions because certain materials are corrosive and react with containers. In the pharmaceutical industry, levitators provide a contaminant-free space for medicine fabrication.

Medicine droplets suspended in midair by an acoustic levitator. Image by the United States Department of Energy and in the public domain, via Flickr Creative Commons.
Of course, levitating larger objects would widen the scope of what could be accomplished. To expand the capabilities of acoustic levitators, Lothar Holitzner of the Paul Scherrer Institute in Switzerland created a step-by-step process for modeling a realistic, improved acoustic levitator. He presented his work at the COMSOL Conference 2018 Lausanne.
Holitzner says that the evolution of acoustic levitators has given rise to various models to calculate them, such as the analogy model or diverse finite element models. The problem with most current models, though, is that they address only certain aspects (like mechanical details) of the levitator. What’s missing is a “total description of all interactions within a common multiphysics model,” explains Holitzner. To fill this gap, he set up a model using the COMSOL Multiphysics® software, calling it an “ideal tool.”
6 Steps to Modeling an Upside-Down Acoustic Levitator with COMSOL Multiphysics®
Holitzner was inspired to design the levitator for use as a sample environment in neutron scattering experiments, such as small-angle neutron scattering (SANS) or X-ray scattering experiments, both of which are available to him at the Paul Scherrer Institute in Switzerland.
Before designing the levitator itself, Holitzner considered design parameters for the sample that would be levitated. Since he wanted the design of the model to be practical and realistic, he studied existing levitators and how they were used. From this, he decided that the sample size should be as large as possible, which helped him determine that the transducer frequency should be in the lower ultrasonic range, around 22 kHz (an inaudible sound). He then wondered, “Should the device levitate both solid and liquid samples?” This question ultimately led to an innovative design for the transducer.
In a typical acoustic levitator setup, when a cascading liquid sample touches the transducer, the sample atomizes. Holitzner realized that if he wanted his levitator to lift both solid and liquid samples, he would need to change the orientation — in other words, turn the acoustic levitator upside down, with the transducer placed above the reflector.
After making this decision, he was inspired by sketches of a 20-kHz reference model designed by E.G. Lierke. Based on the reference, he set up a new piezoelectric transducer prototype (this resonator is mechanically coupled) to radiate the 22 kHz down to the reflector. He replaced the piezoelectric pair with a piezoelectric stack, in order to reduce the voltage, and adjusted the frequency. Then, he placed the solid sample, which is spherical and has a diameter of 4 mm, below the transducer and improved the levitator step by step.
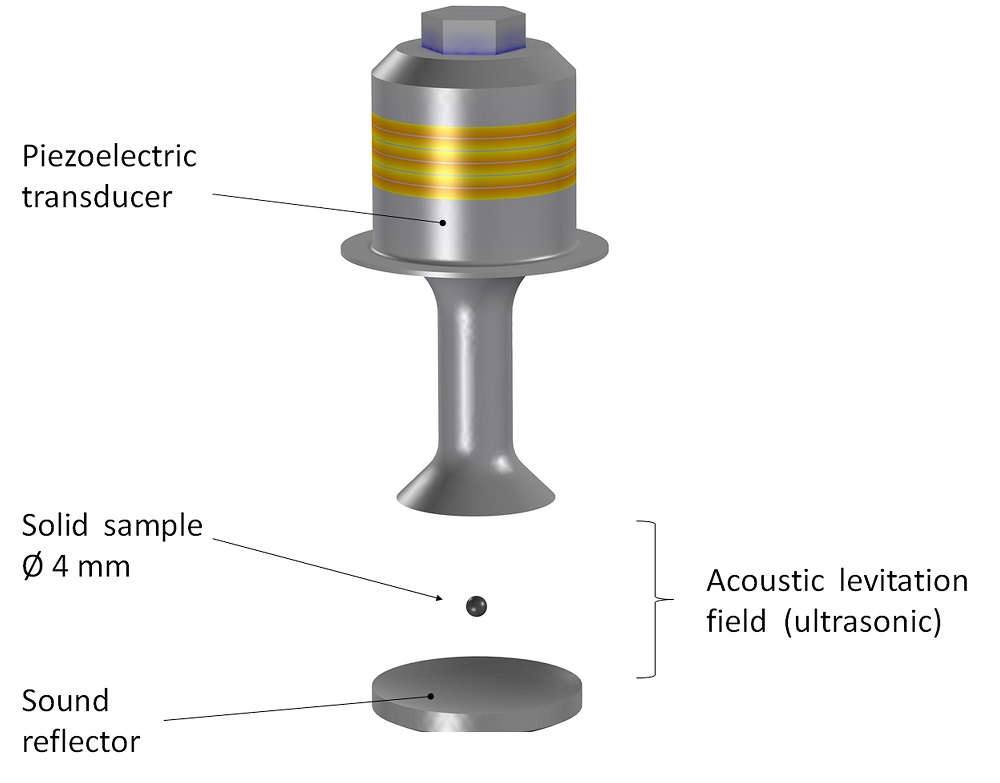
Upside-down acoustic levitator. Image courtesy of Lothar Holitzner.
Step 1: Assembling the Transducer
First, Holitzner performed a static study at the prestressed stage using the add-on Structural Mechanics Module. He then axially preloaded the transducer’s rings with a clamping screw (so that the central bolt was under pretension). In case of open piezo electrodes, the calculated voltage (i.e., the floating potential) can show the mechanical preload.
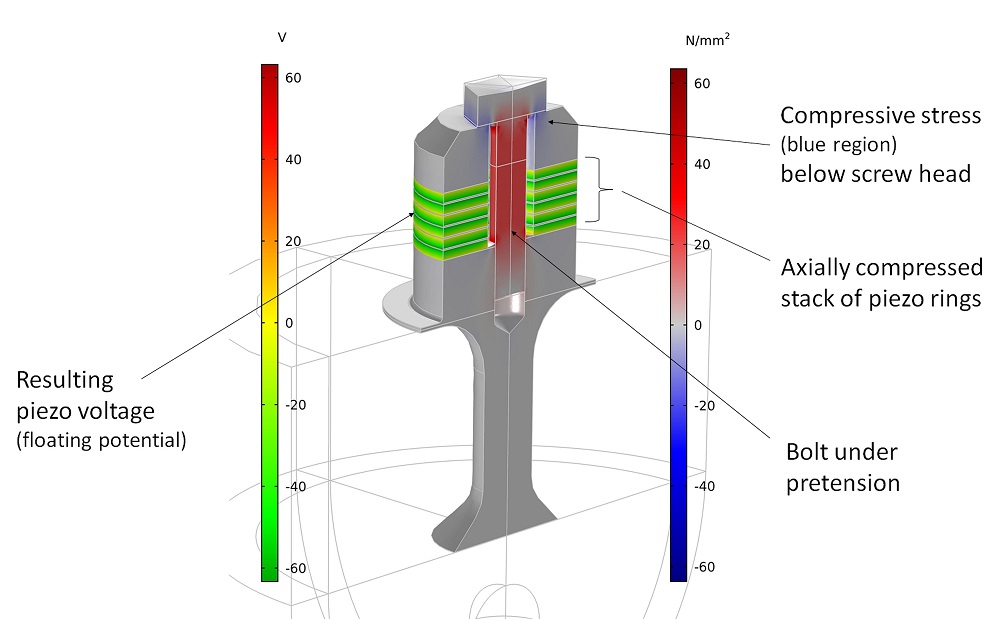
Voltage and axial stress after prestressing the central bolt. Image courtesy of Lothar Holitzner.
Step 2: Determining the Transducer Geometry
Next, Holitzner ran an eigenfrequency study to:
- Examine the prestressed transducer’s natural oscillations
- Rule out tilt and pendulum oscillations for the transducer
Also at this stage, he tuned the resonance frequency to 22 kHz by adjusting the transducer geometry and then placed the velocity node on the same level as the fixing flange.
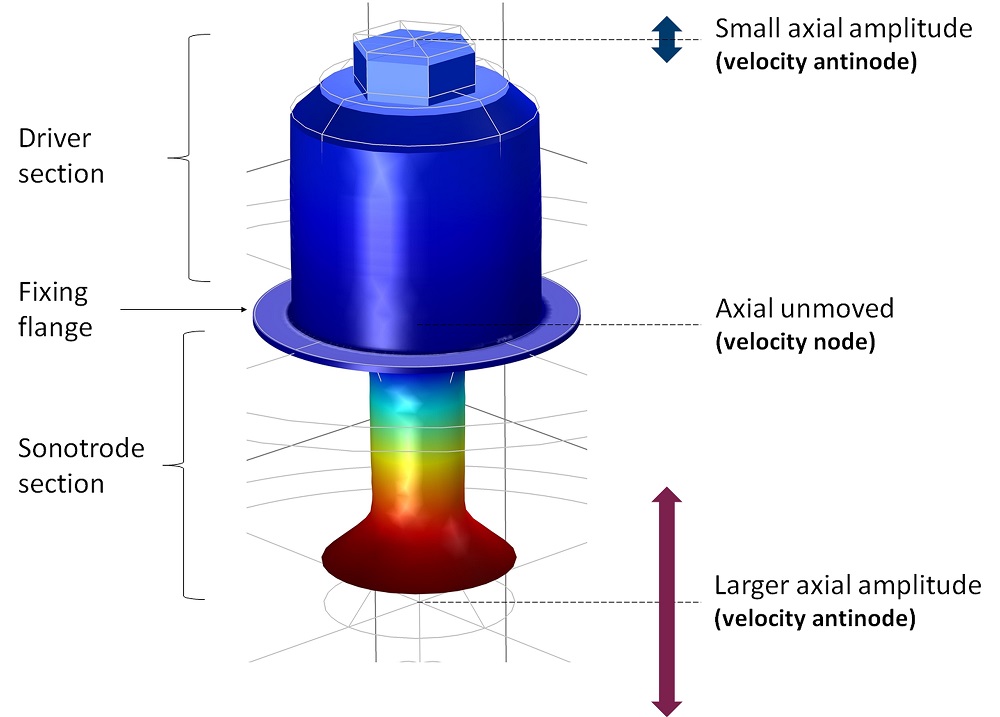
Total displacement (amplitude) of the transducer for an eigenfrequency of 22,002 Hz with a deformation scale factor of 500. Image courtesy of Lothar Holitzner.
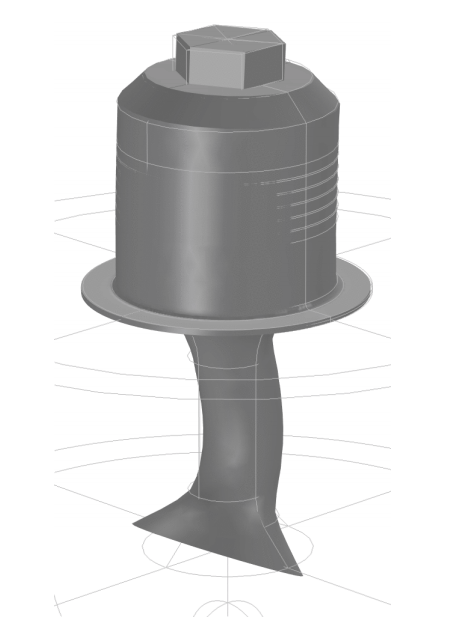
Undesired oscillation at 19,963 Hz with a deformation scale factor of 130. Image courtesy of Lothar Holitzner.
Step 3: Vibrating the Prestressed Transducer
With the help of the AC/DC Module, Holitzner performed a frequency-domain study, vibrating the transducer to harmonic oscillations. Note that during this step, the amplitude resonance curve’s shape indicates the Rayleigh damping in the material for the transducer.
Using the Acoustics Module, he also calculated the acoustic-solid interaction between the following:
- Transducer
- Reflector
- Acoustic levitation field
- Solid sample
The maximum power of the oscillating transducer radiates into the gas domain. This occurs when the distance between the reflector and face of the sonotrode is tuned to resonance at the maximum acoustic impedance, as shown below on the left. In addition, Holitzner examined the optimized intense sound field with five stationary pressure nodes in the acoustic standing wave, during which a sample sphere was placed in the third pressure node, enabling him to see the frequency-dependent power transfer going from the electrodes to the levitation sound field.
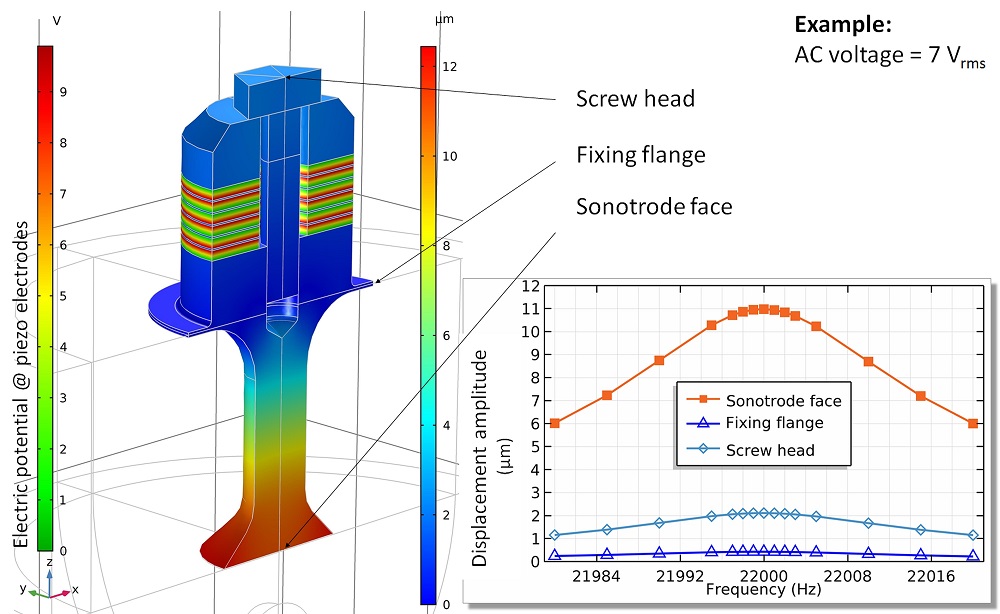
The displacement amplitude at 22,000 Hz and for the z-component. Image courtesy of Lothar Holitzner.
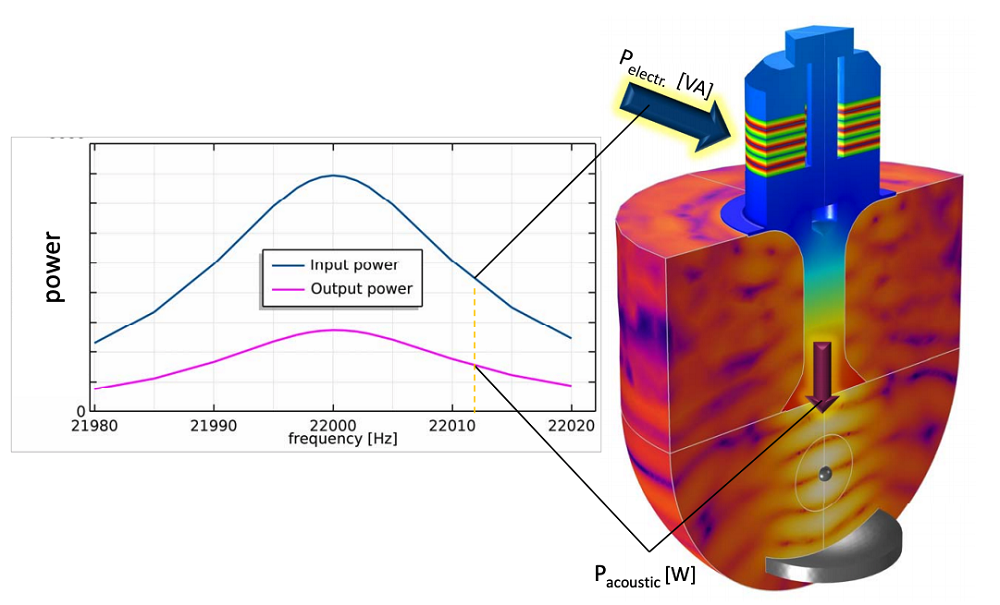
The power transfer from the piezo electrodes to the levitation sound field. The input is the electrical power, calculated from the piezo current and voltage, and the output is the acoustically radiated power, calculated at the sonotrode face boundaries. Image courtesy of Lothar Holitzner.
Step 4: Examining the Transducer Motion
The next study, which was time dependent, examined the transducer oscillation at the resonance frequency (22 kHz) in a resolved motion sequence. In the image below, which shows the axial stress in the transducer, the blue areas indicate the compressive stress and the red areas indicate the tension.
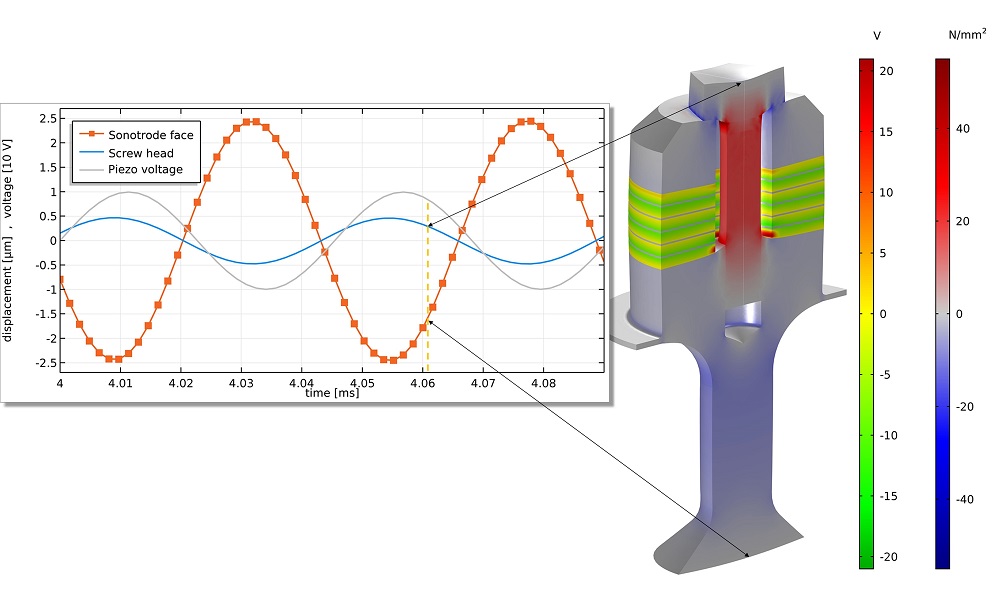
Transducer displacement field (z-component) showing the piezo voltage. Image courtesy of Lothar Holitzner.
Step 5: Scanning the Sample Position
Next, Holitzner focused on the solid sample component of the acoustic levitator model, which was pushed into the pressure node by the acoustic radiation pressure generated from the sound field. Using the Pressure Acoustics, Frequency Domain interface, he entered the velocity at the sample surface in order to get the vertical force on the sample surface as a result.
He then investigated the levitation force progression by conducting a parametric sweep of the vertical sample position over the pressure node region. This force progression was then used as an input in the next (and last) step.
Step 6: Calculating the Sample Force Balance
Holitzner found the force balance for the solid sample by focusing on the mesh. He based the mesh of the gas domain on a moving mesh in the software because it enables the sample domain to change its position. Then, he was able to calculate the final vertical sample position with a force balance equation and move the sample by a prescribed displacement. The mesh around the sample deformed accordingly.
Then, Holitzner recalculated the pressure acoustics field with the new sample position. This confirmed the force equilibrium between the sample’s weight and the vertical acoustic radiation forces on the surface.
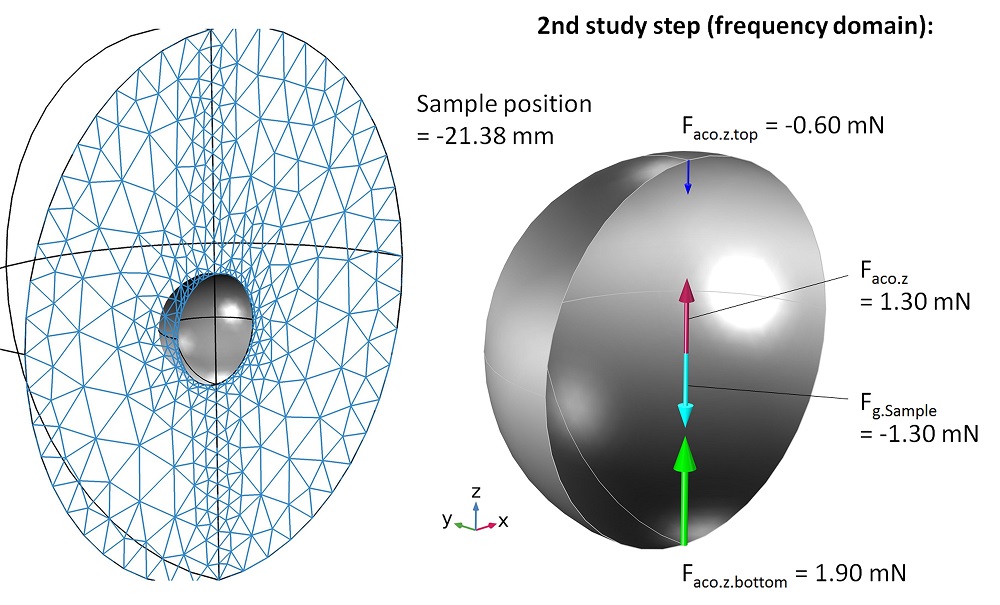
Finding the balance for the solid sample via studies performed for the mesh and geometry. Image courtesy of Lothar Holitzner.
By following a step-by-step approach to modeling, Holitzner could closely study various multiphysics phenomena at different stages in acoustic levitators and look for opportunities for further improvement. As illustrated by this process, it’s helpful to understand basic properties of acoustic levitators, such as the frequency-dependent power transfer from the piezo electrodes to the levitation sound field, mechanical stress and deformation of the transducer component, pressure and forces used to levitate the sample component, how the position of the sample changes the force progression, and more.
Next Steps
Want more details about Lothar Holitzner’s work on acoustic levitator design? Click the button below:
Get started on the basics with an acoustic levitator tutorial.


Comments (0)